Wrangler
Task
Deploying a Worker through dashboard is good for quick tests. You may also want to use our Workers Playground for the same purpose. But in a production setting, you probably need things like version control, TypeScript, CI/CD support, and the ability to deploy your Worker to different environments.
In the rest of this course, we'll build a more complex project demonstrating some of the concepts mentioned above and introducing more products from Cloudflare's Developer Platform portfolio.
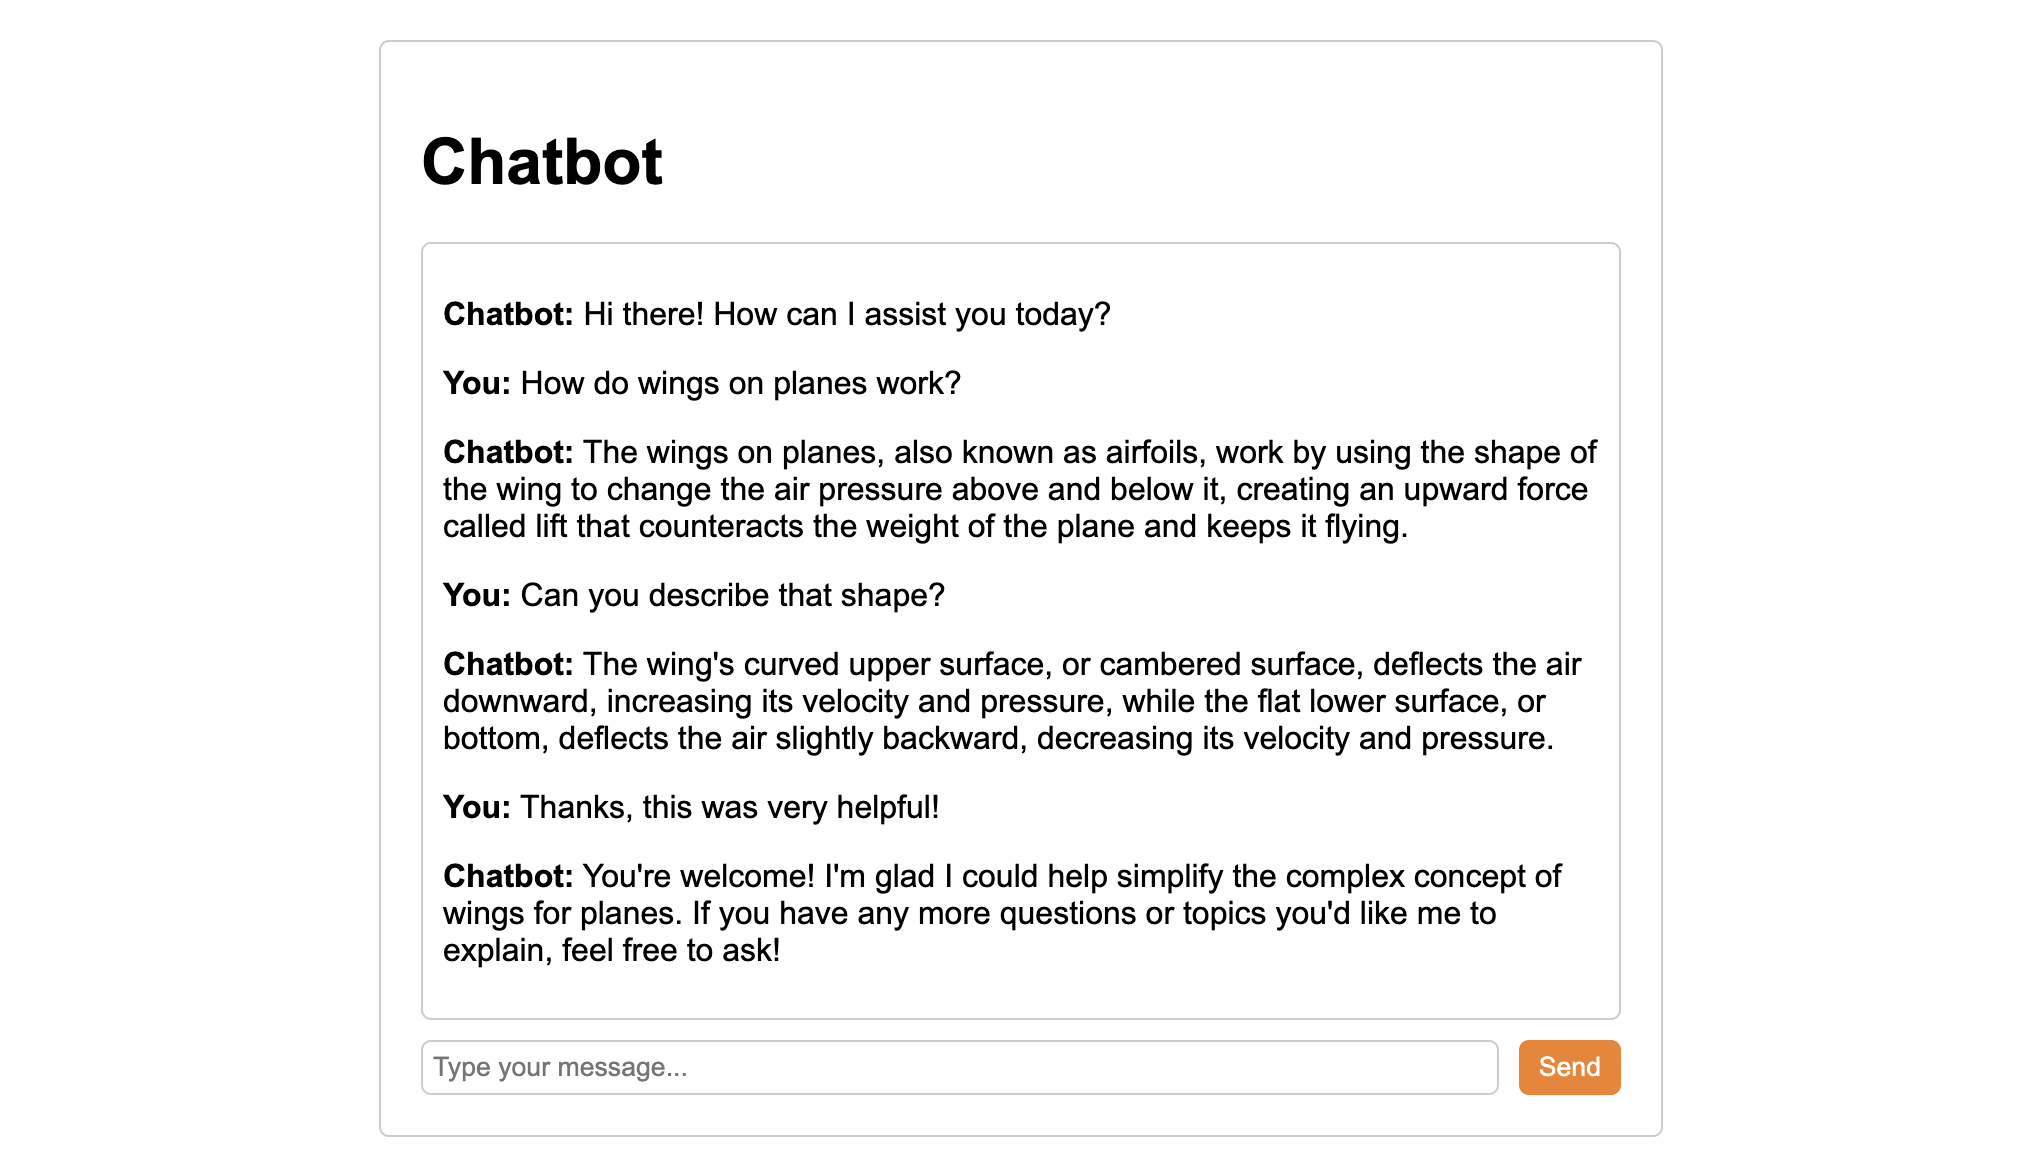
Your task in the rest of this course will to build a simple conversational bot powered by a Large Language Model (LLM). The bot will have a simple web interface served from a Worker, it will save all conversations and it will allow users to resume conversations at a later time. The final result should look like this:
Prerequisites
We are assuming you have access to an environment with Node running on version 16.17.0 or later.
ℹ️
If you don't have Node installed yet, consider installing it using a Node version manager like nvm to avoid permissions issues
Steps
Let's start by creating and deploying a new Worker using a command line. Developer Platform has two command-line interfaces (CLI):
- C3 (Create-Cloudflare CLI): Helps you create and set up new projects.
- Wrangler: Helps you manage, build and deploy existing projects.
1. Create a new project
Start by creating a new Worker project using C3. When asked, give your project a name, select "Hello World" Worker to start, say yes to TypeScript and Git and no to deploying your application.
npm create cloudflare@latest...
├ In which directory do you want to create your application?
│ dir ./worker-chatbot
│
├ What type of application do you want to create?
│ type "Hello World" Worker
│
├ Do you want to use TypeScript?
│ yes
...
├ Do you want to use git for version control?
│ yes
...
├ Do you want to deploy your application?
│ no
...Next, enter the directory with your newly created project:
cd ./worker-chatbot2. Install Wrangler (optional)
This was the only time we used C3, but we will be using Wrangler a lot, so you may want to install it globally (you don't have have to, but then you will need to prefix every wrangler command in this guide with npx, e.g. npx wrangler -v):
npm install wrangler -g3. Prepare Worker scaffolding
ℹ️
In this tutorial we will show you how to build everything exclusively with the products we're covering, without any 3rd party frameworks. This may not always be the easiest way to build though, so as we go along, we will recommend some 3rd party frameworks you may want explore.
Our Worker will handle 3 different routes:
- Welcome page
- Chat frontend page the users interact with
- Chat backend that generates the LLM responses
ℹ️
We will handle these routes manually in the Worker, but for your next project after this, do have a look at Hono. This is a great framework that, among other things, includes a nice and easy-to-use router.
We could handle all 3 of these from the same Worker file, but for readability it'll be best to split them up.
Go ahead and create a new handlers folder with the following 3 empty files in it:
└── src
    └── handlers
        ├── rootGet.ts
        ├── chatGet.ts
        └── chatPost.ts
Now let's add some boilerplate code to get us started. Let's start with the src/index.ts - replace the default "Hello World" template with the following:
⚙️ line-start-1 ⚙️
import { handleRootGet } from './handlers/rootGet';
import { handleChatGet } from './handlers/chatGet';
import { handleChatPost } from './handlers/chatPost';

interface Routes {
  [path: string]: {
    [method: string]: (request: Request, env: Env, ctx: ExecutionContext) => Promise<Response>;
  };
}

const routes: Routes = {
  '/': {
    GET: handleRootGet,
  },
  '/chat': {
    GET: handleChatGet,
    POST: handleChatPost,
  },
};

export default {
  async fetch(request: Request, env: Env, ctx: ExecutionContext): Promise<Response> {
    const url = new URL(request.url);
    const routeKey = url.pathname;
    const method = request.method;

    const routeHandlers = routes[routeKey];
    if (routeHandlers && routeHandlers[method]) {
      return routeHandlers[method](request, env, ctx);
    }

    return new Response('Not Found', { status: 404 });
  },
};
src/index.ts
This imports the handlers for all 3 paths (lines 1-3), looks at the path component of the request URL (line 26) and selects and executes the handler (lines 29-31).
Next, let's add a simple welcome page to handlers/rootGet.ts
⚙️ line-start-1 ⚙️
// Handle GET request for the root route ('/')
export async function handleRootGet(request: Request, env: Env, ctx: ExecutionContext): Promise<Response> {
  // Return a simple welcome page
  return new Response(
    `<html>
      <head><title>Chatbot</title><style>body{font-family:Helvetica,sans-serif;}</style></head>
      <body><h1>Welcome to a Worker chatbot!</h1><p><a href="/chat">Start a chat!</a></body>
    </html>`,
    { headers: { 'Content-Type': 'text/html' } }
  );
}
And lastly add some scaffolding to handlers/chatGet.ts
⚙️ line-start-1 ⚙️
// Handle GET request for the '/chat' route
export async function handleChatGet(request: Request, env: Env, ctx: ExecutionContext): Promise<Response> {
  return new Response('Hello from the chat route!');
}
And handlers/chatPost.ts
⚙️ line-start-1 ⚙️
// Handle POST request for the '/chat' route
export async function handleChatPost(request: Request, env: Env, ctx: ExecutionContext): Promise<Response> {
  return new Response('Received a POST request on the chat route!');
}
4. Test the Worker
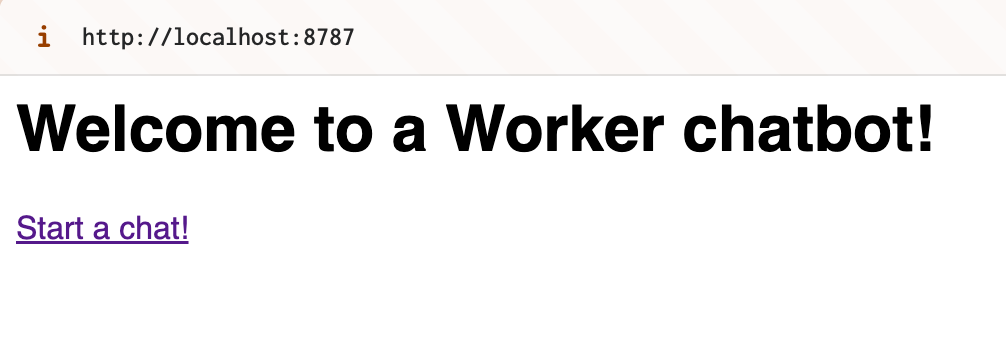
Start the worker locally by running npm start which executes wrangler dev (so feel free to run that directly if you want).
wrangler dev ⛅️ wrangler 3.57.2
-------------------
⎔ Starting local server...
[wrangler:inf] Ready on http://localhost:8787Now if you navigate to that URL, you should see the welcome page:
Similarly, if you try to send GET and POST requests to the /chat endpoint, you should see responses from their respective handlers:
curl -X GET localhost:8787/chatHello from the chat route!And POST:
curl -X POST localhost:8787/chatReceived a POST request on the chat route!Great, our scaffolding is ready, next let's build a simple UI that can send prompts and receive responses from the backend.