API Shield
Use case
Acme Corp recognizes the critical importance of securing their mobile app APIs in today's digital landscape. However, they face challenges in gaining comprehensive visibility into their API ecosystem and ensuring robust security measures throughout.
At present, Acme Corp lacks a systematic approach to API discovery, leaving them vulnerable to potential threats lurking within their API landscape. Without a clear understanding of their full API estate, they are unable to proactively identify vulnerabilities and safeguard against potential risks.
Furthermore, the absence of a structured schema from developers complicates their ability to implement a positive security model effectively. This gap hampers their efforts to enforce stringent security measures and maintain data integrity across their API infrastructure.
To address these pressing concerns, Acme Corp has turned to Cloudflare API Shield for comprehensive API security solutions. By leveraging API Shield, Acme Corp aims to:
- Build ironclad security across all APIs, even the hidden ones
- Streamline management and gain insights into API traffic
- Enhance defenses with intelligent learning to proactively block advanced threats
Lab environment
This lab is a bit special. That's because when we spun up your lab, we preconfigured couple things for you. Let's now go through what exactly we did.
First, we preconfigured a simple public API for you. It lives on the public-api.* subdomain and we have now been sending traffic there for over 24h. This is so that the API Shield's machine learning algorithms have enough time to learn and we can show you how their results look like.
But don't worry, we don't want to rob you of the experience of configuring an API on your own, you will set one up from scratch later.
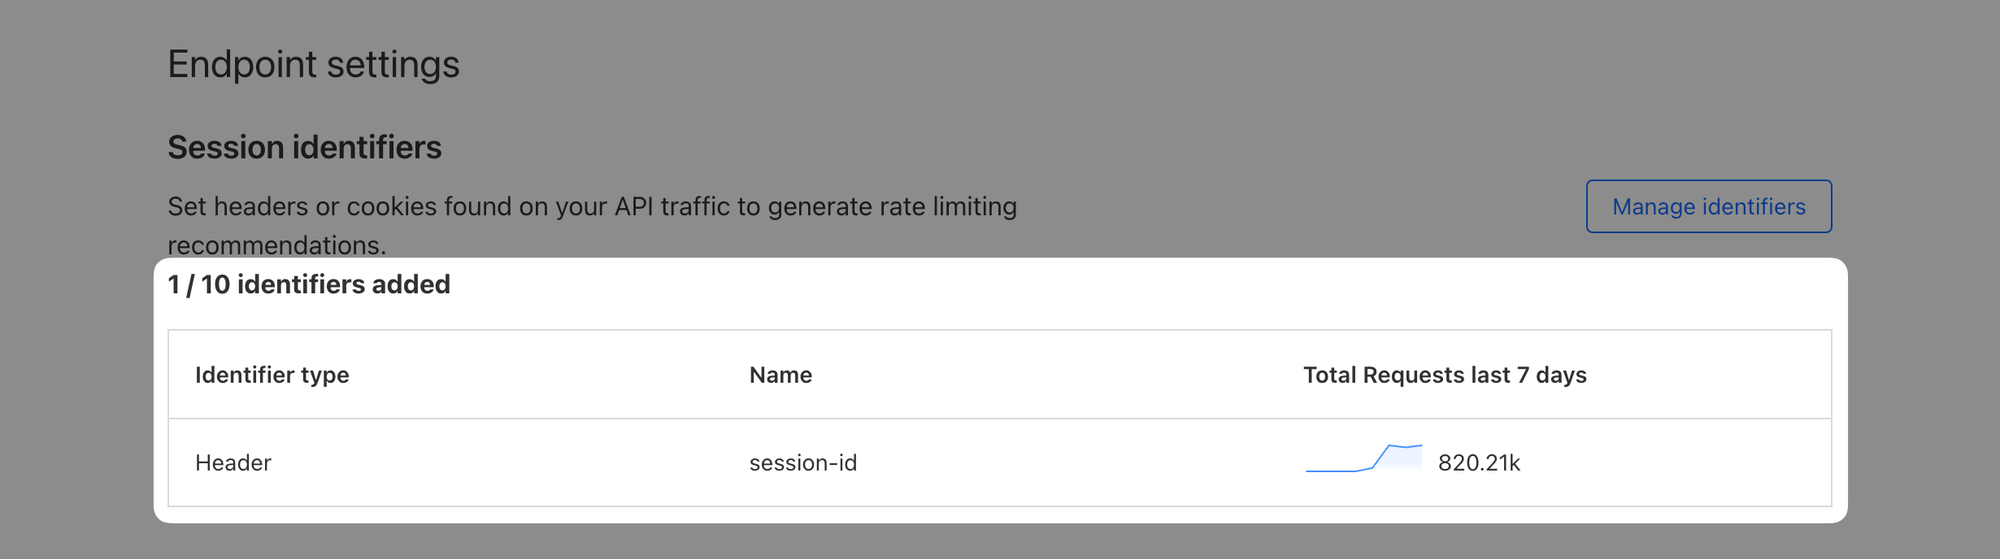
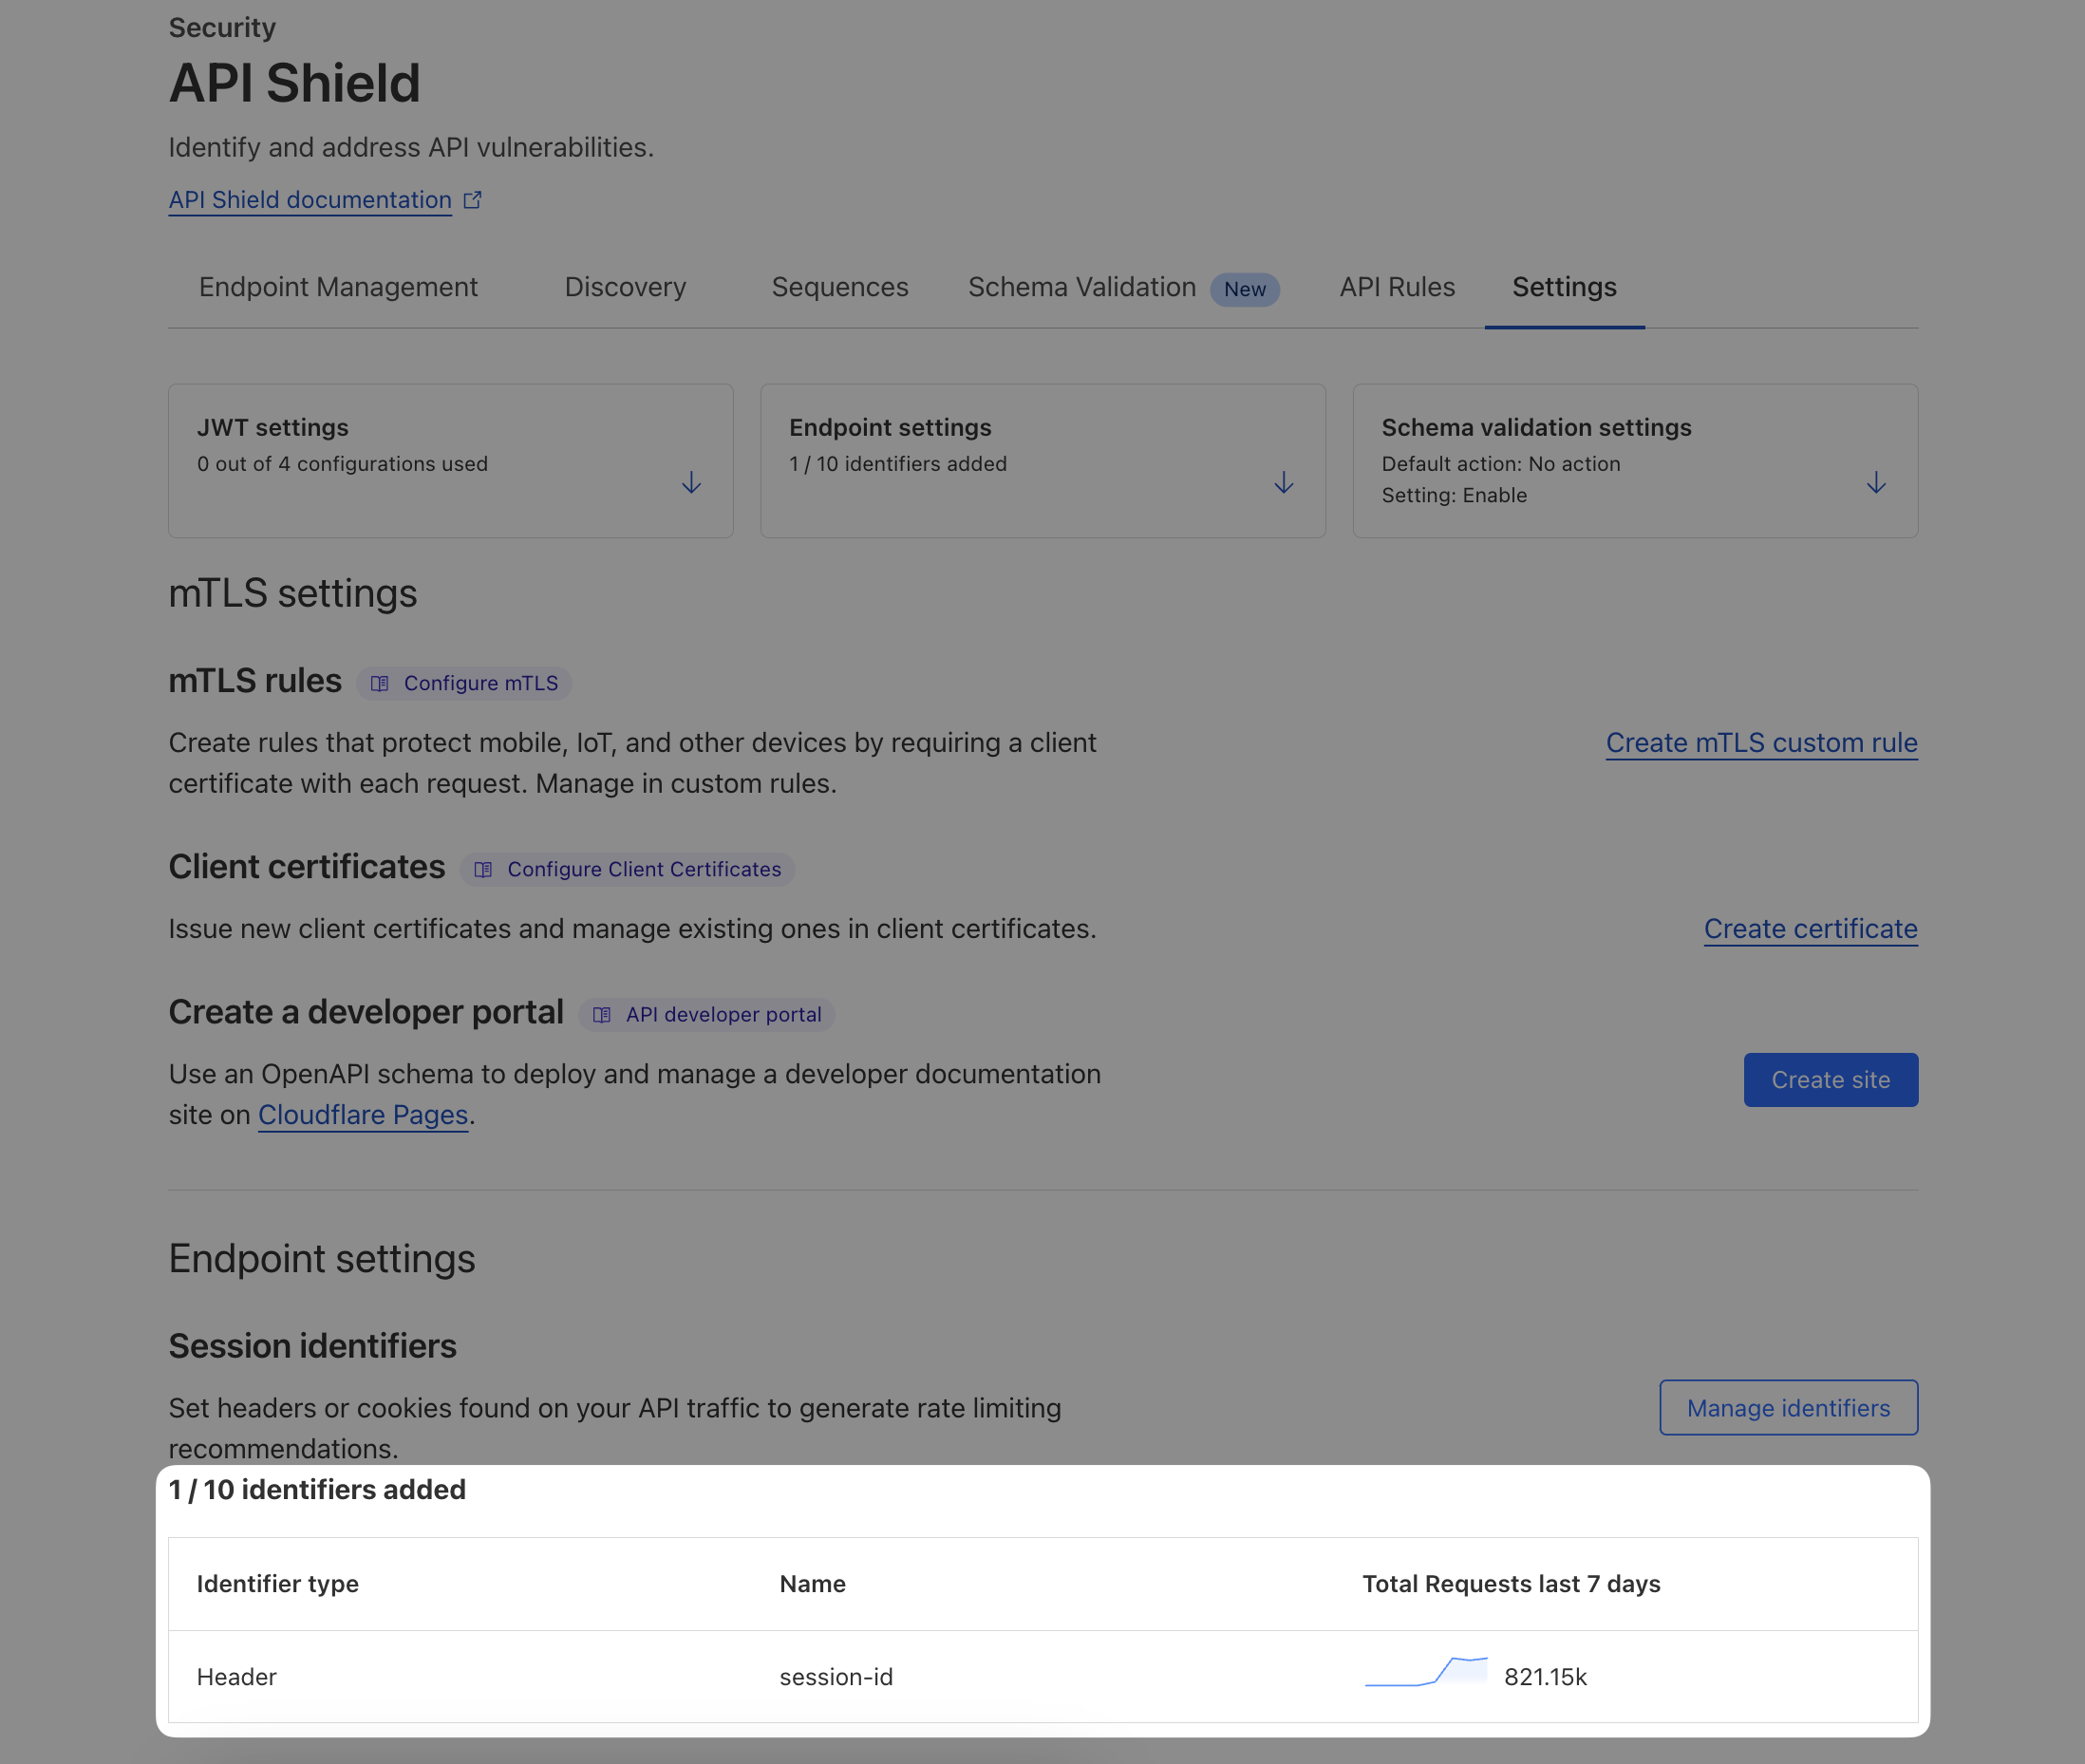
Second thing we did on your behalf is that we preconfigured a session identifier in your API Shield Settings (we'll show you how exactly later). Using this session identifier, Cloudflare identifies authenticated API endpoints and we use the HTTP Header "session-id" to distinguish individual sessions and provide intelligent recommendations:
Ok, with that out of the way, let's get to the labs!
Steps
1. Review API Analytics
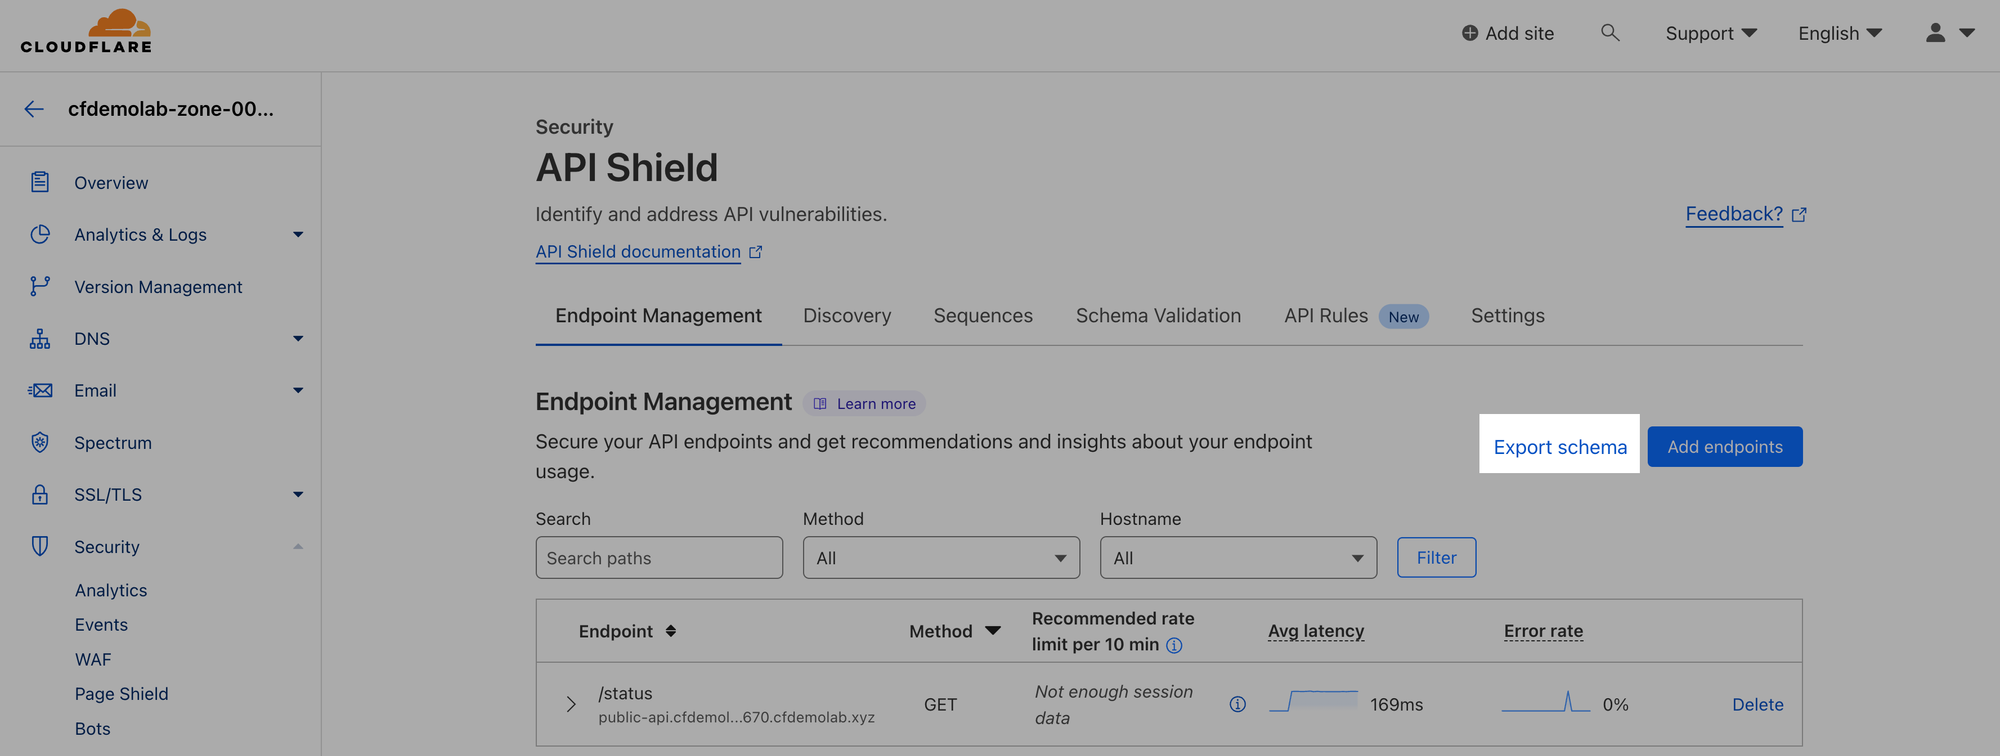
Let's start by looking at what the API Shield learnt about the traffic coming to the public API we preconfigured. Open your zone and navigate to Security ‣ API Shield.
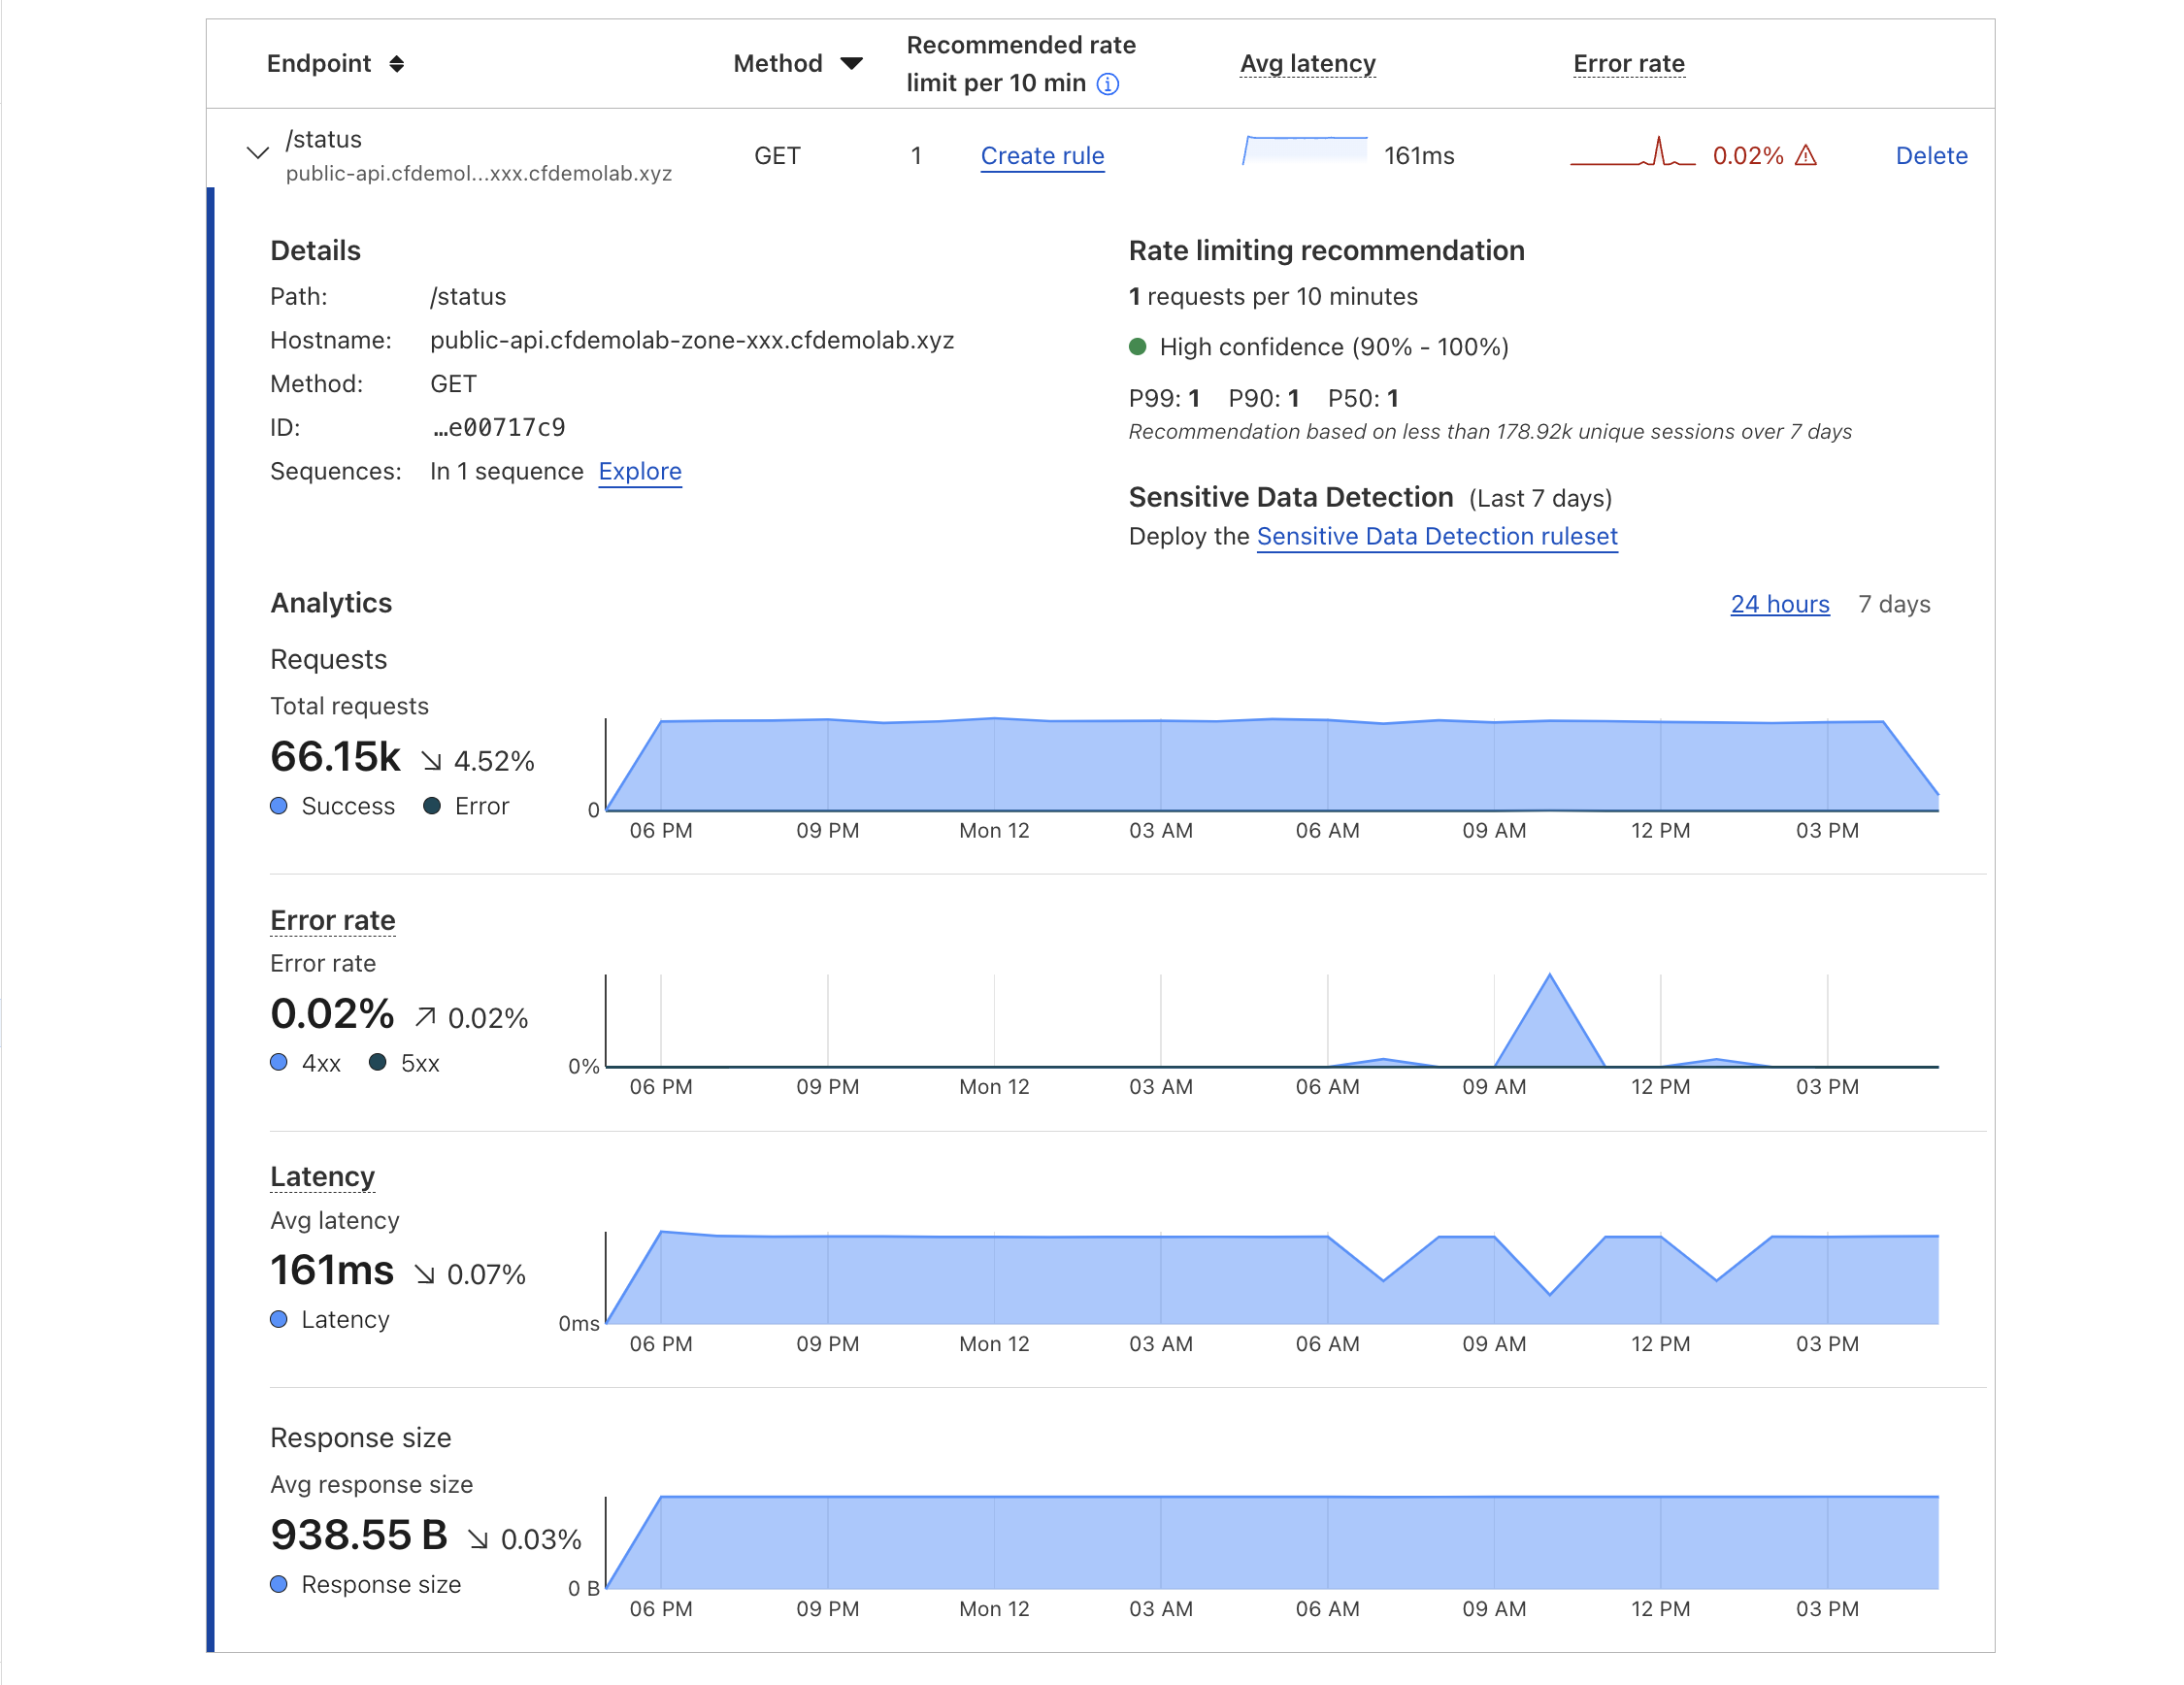
In the first tab titled Endpoint Management, you will find see one endpoint we added manually when we preconfigured that API. API Shield has been monitoring traffic to this endpoint for the past 24h and it should now have a recommended rate limit ready for you based on the traffic it saw.
You can expand the endpoint's details and explore the statistical data about the traffic it has been receiving so far.
2.Export a learned schema
With this visibility, Acme Corp wants to enforce better security practices such as a positive security model. However, Acme Corp developers had not built the schema for them to enforce schema validation.
The good news is while Cloudflare has been monitoring traffic to these endpoints, they also learnt the schema parameters via traffic inspection.
You can export the OpenAPI schemas in v3.0.0 format by hostname for the developers' review so that Acme Corp can start enforcing a positive security model.
Select Export schema and choose a hostname to export.
Select whether to include learned parameters and rate limit recommendations
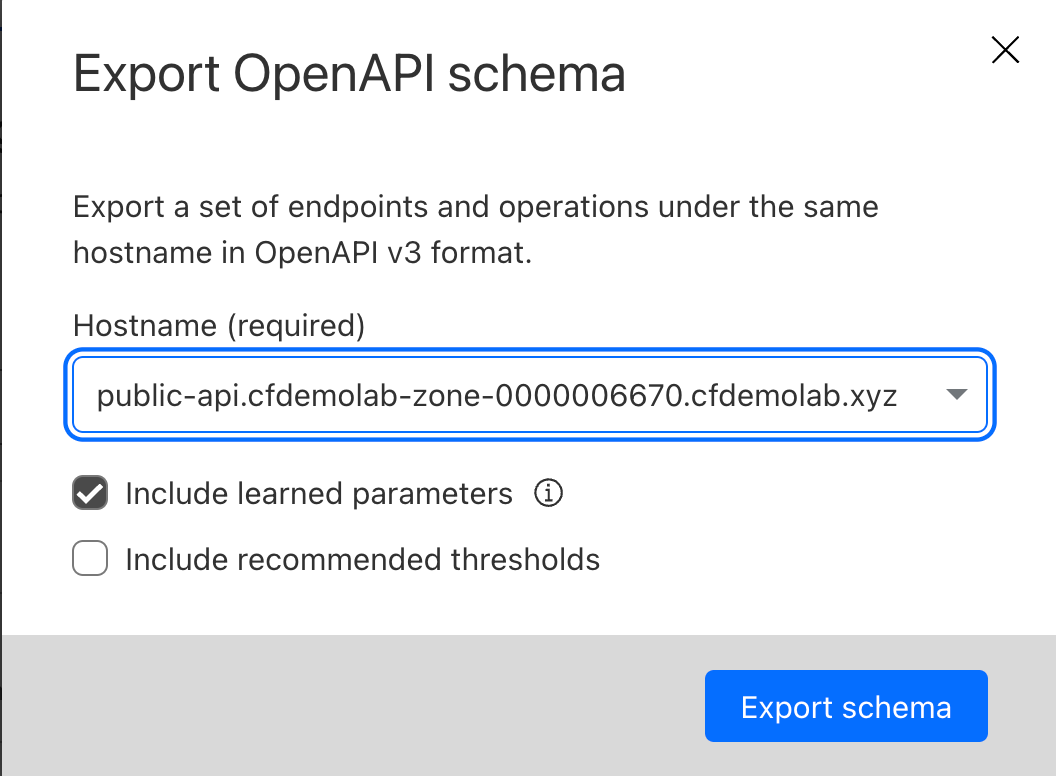
Select Export schema and choose a location to save the file.
3.Prevent Volumetric API Abuse
Cloudflare has been learning traffic patterns on your API endpoints to help you set up a system of adaptive rate limiting to prevent volumetric API abuse.
Once rate limit recommendations appear in Endpoint Management, select the endpoint row to view more detail about the recommendation. You will see the overall recommended rate limit value, as well as p99, p90, and p50 rate limit values.
Cloudflare recommends choosing the overall rate limit recommendation, as our analysis includes the variance of the request rate distribution across your API sessions. Choosing a single p-value may cause false positives due to a high number of outliers.
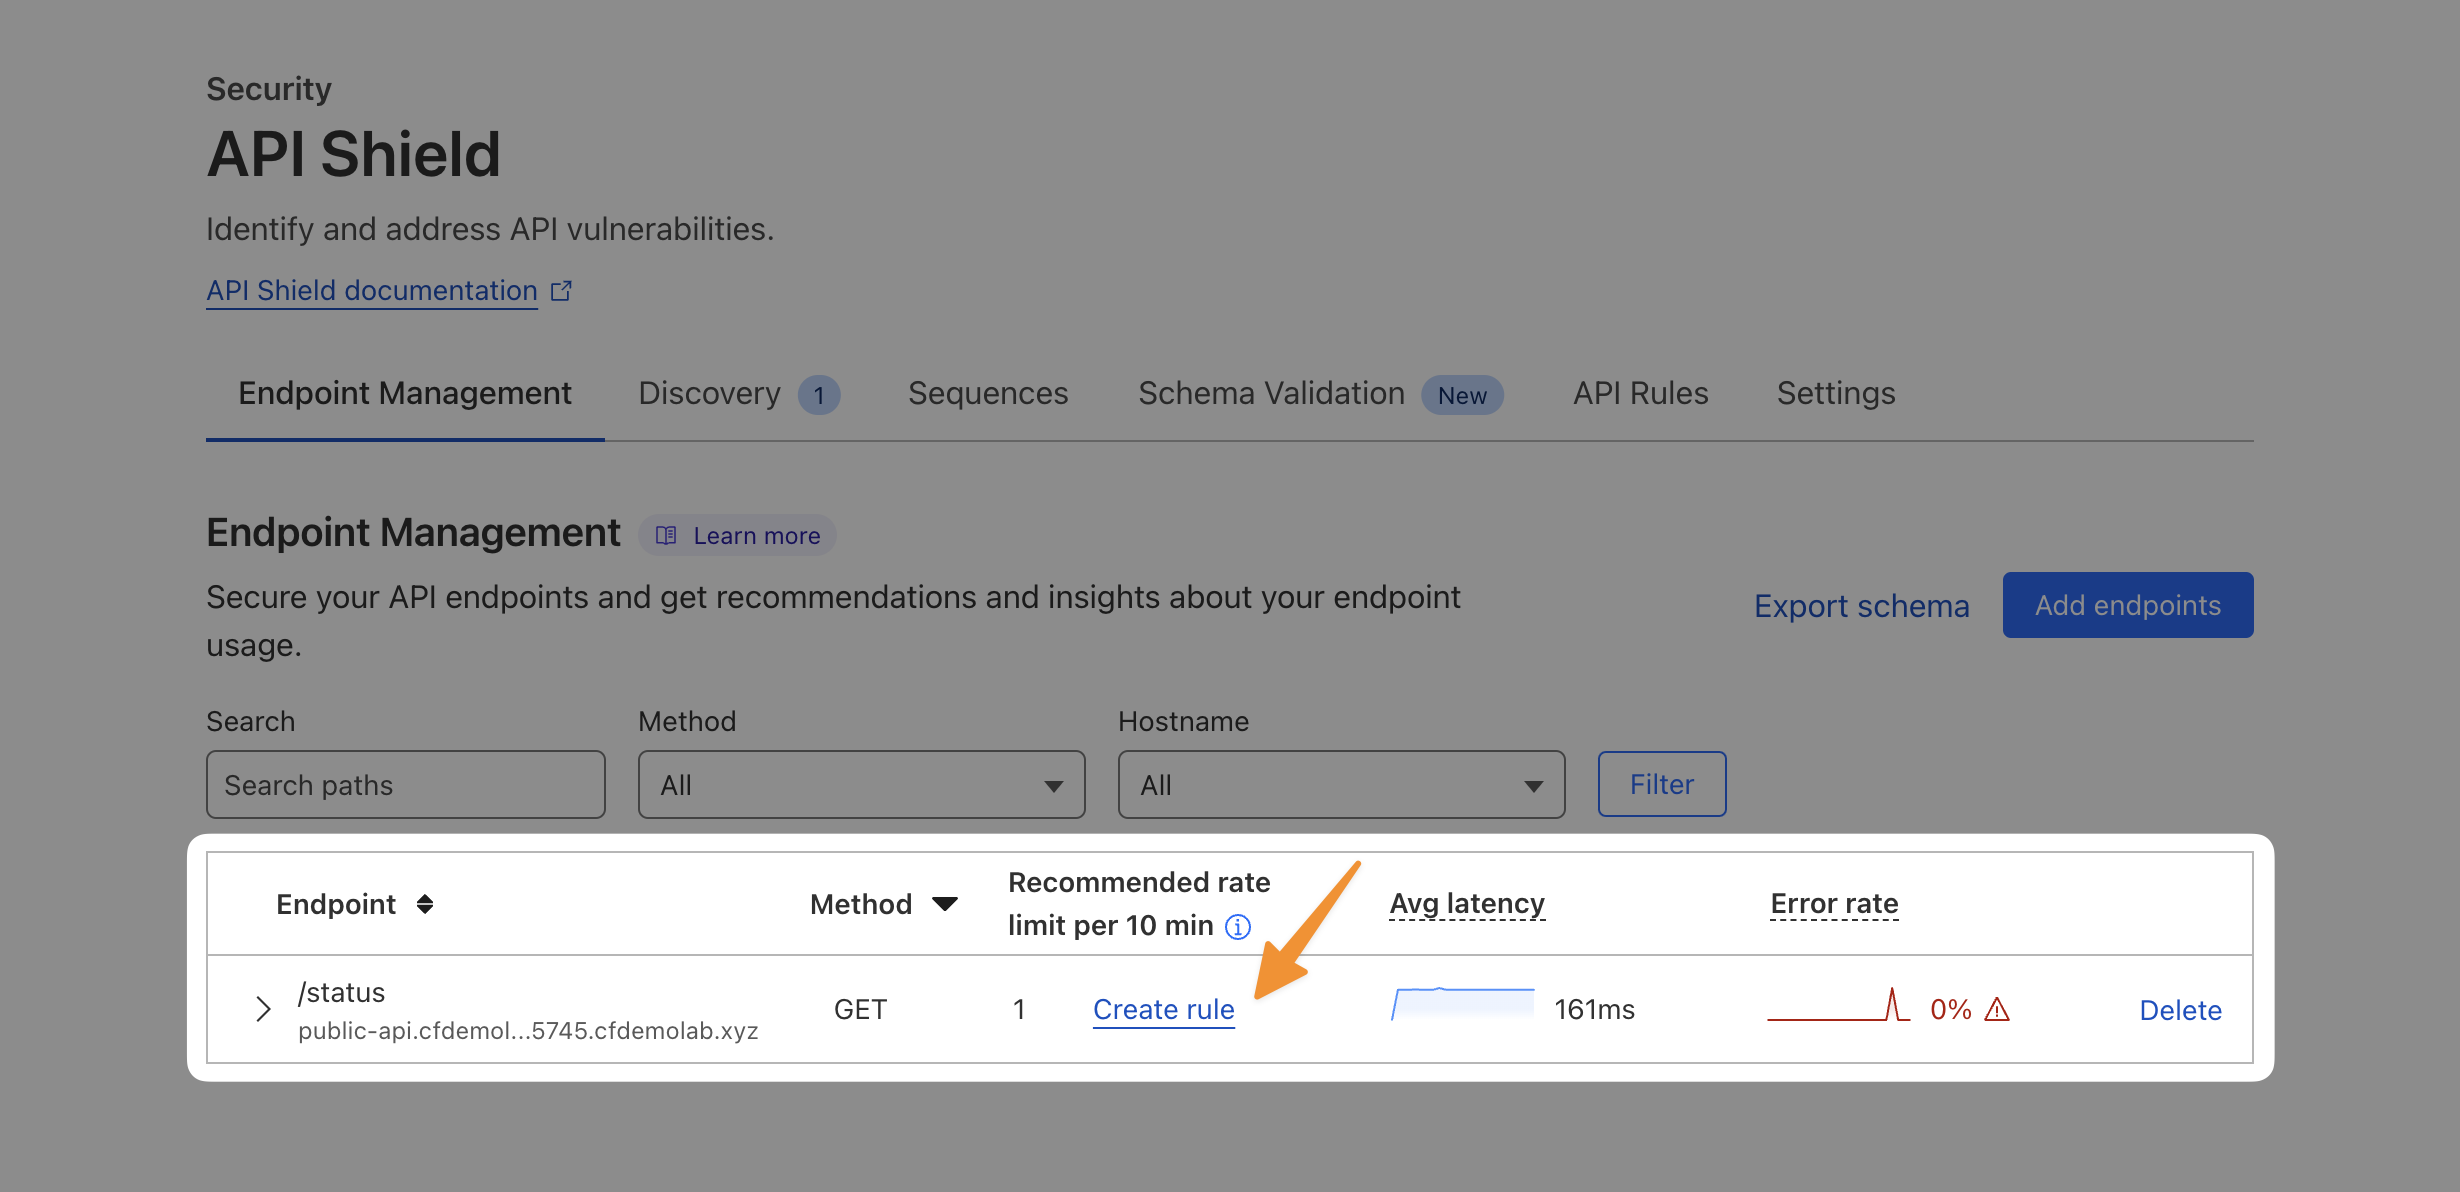
With Cloudflare's recommendations, you can simply select Create Rule. This will pre-populate a new WAF rule for you, keep the the matching expression as-is:

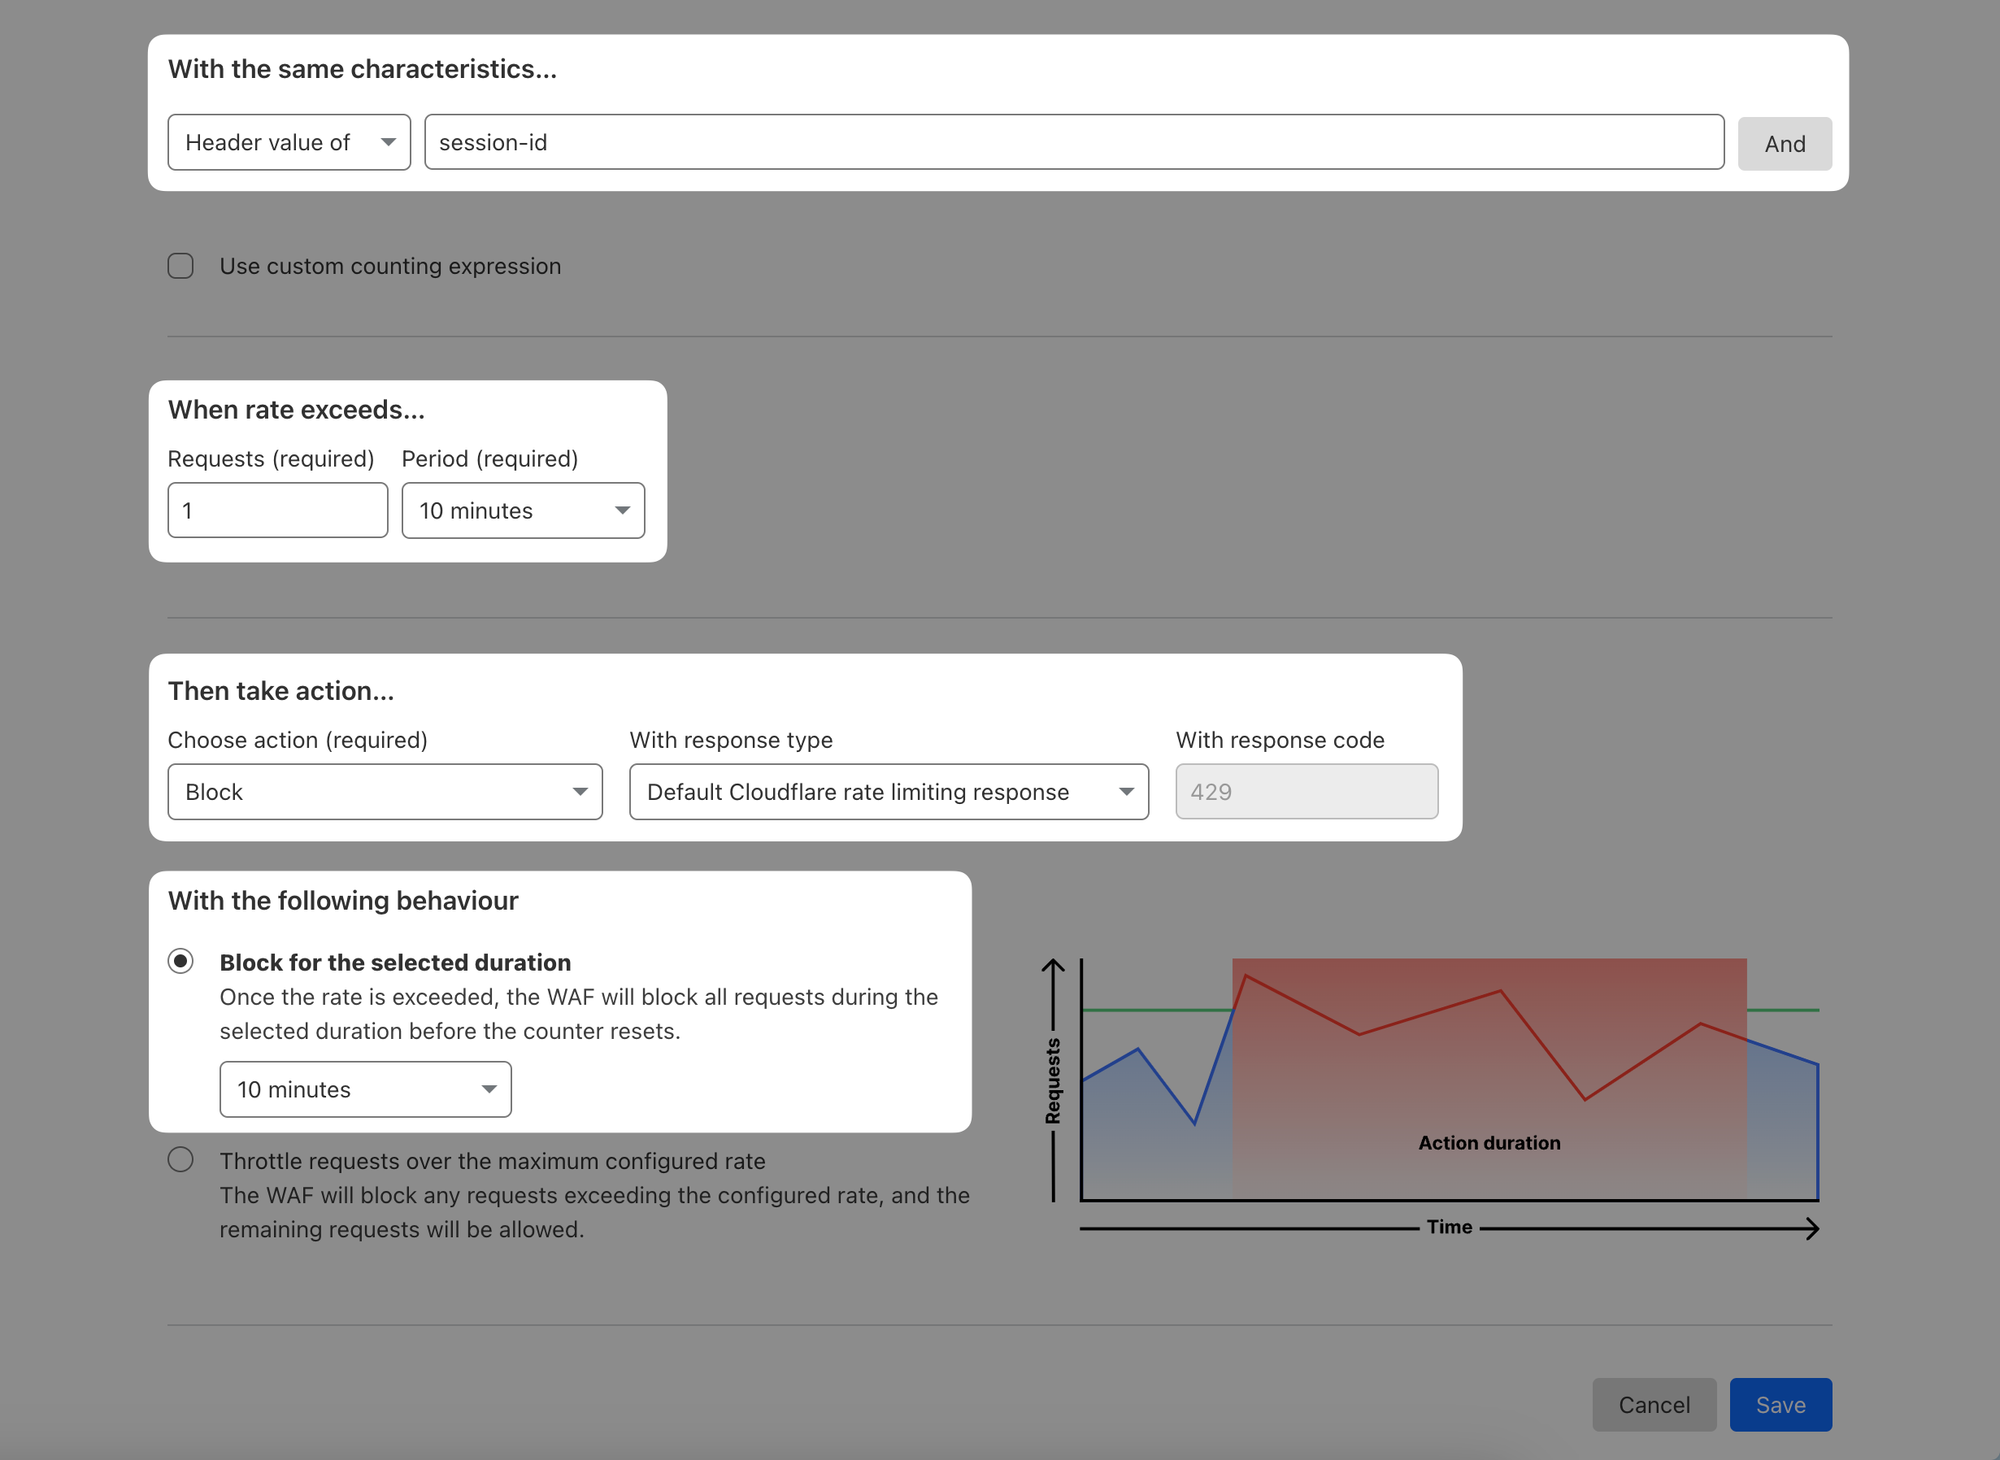
In the second half of the page however, make the following changes:
Then take action... Block with Default response
Block for the selected duration: 10 minutes (this needs to be at least as long as the detection period)
Test rate limiting
First, validate the API can receive requests that fall within the 1 request per 10 minutes window:
$ curl -i https://public-api.cfdemolab-zone-xxx.cfdemolab.xyz/status \
   -H "session-id:1"
HTTP/2 200
...
Now if you try running the same command immediately again, using the same session ID, you should get HTTP error 429 - Too Many Requests, because that exceeds the rate limiting window:
$ curl -i https://public-api.cfdemolab-zone-xxx.cfdemolab.xyz/status \
   -H "session-id:1"
HTTP/2 429
...
If however you use a different session ID, you should still get one request through. All subsequent requests should get throttled again:
$ curl -i https://public-api.cfdemolab-zone-xxx.cfdemolab.xyz/status \
   -H "session-id:2"
HTTP/2 200
...

$ curl -i https://public-api.cfdemolab-zone-xxx.cfdemolab.xyz/status \
   -H "session-id:2"
HTTP/2 429
...
4. Discovery
Besides authenticated endpoints, Acme Corp is also concerned about endpoints that were misconfigured and exposing sensitive information. Acme Corp wants to use API Discovery to map out the full API estate and understand the attack surface area.
To demonstrate how Discovery can help, switch to that tab. You should see an endpoint there that we did not explicitly configure, but because it received some traffic during the last 24h window, API Shield was able to pick it up.
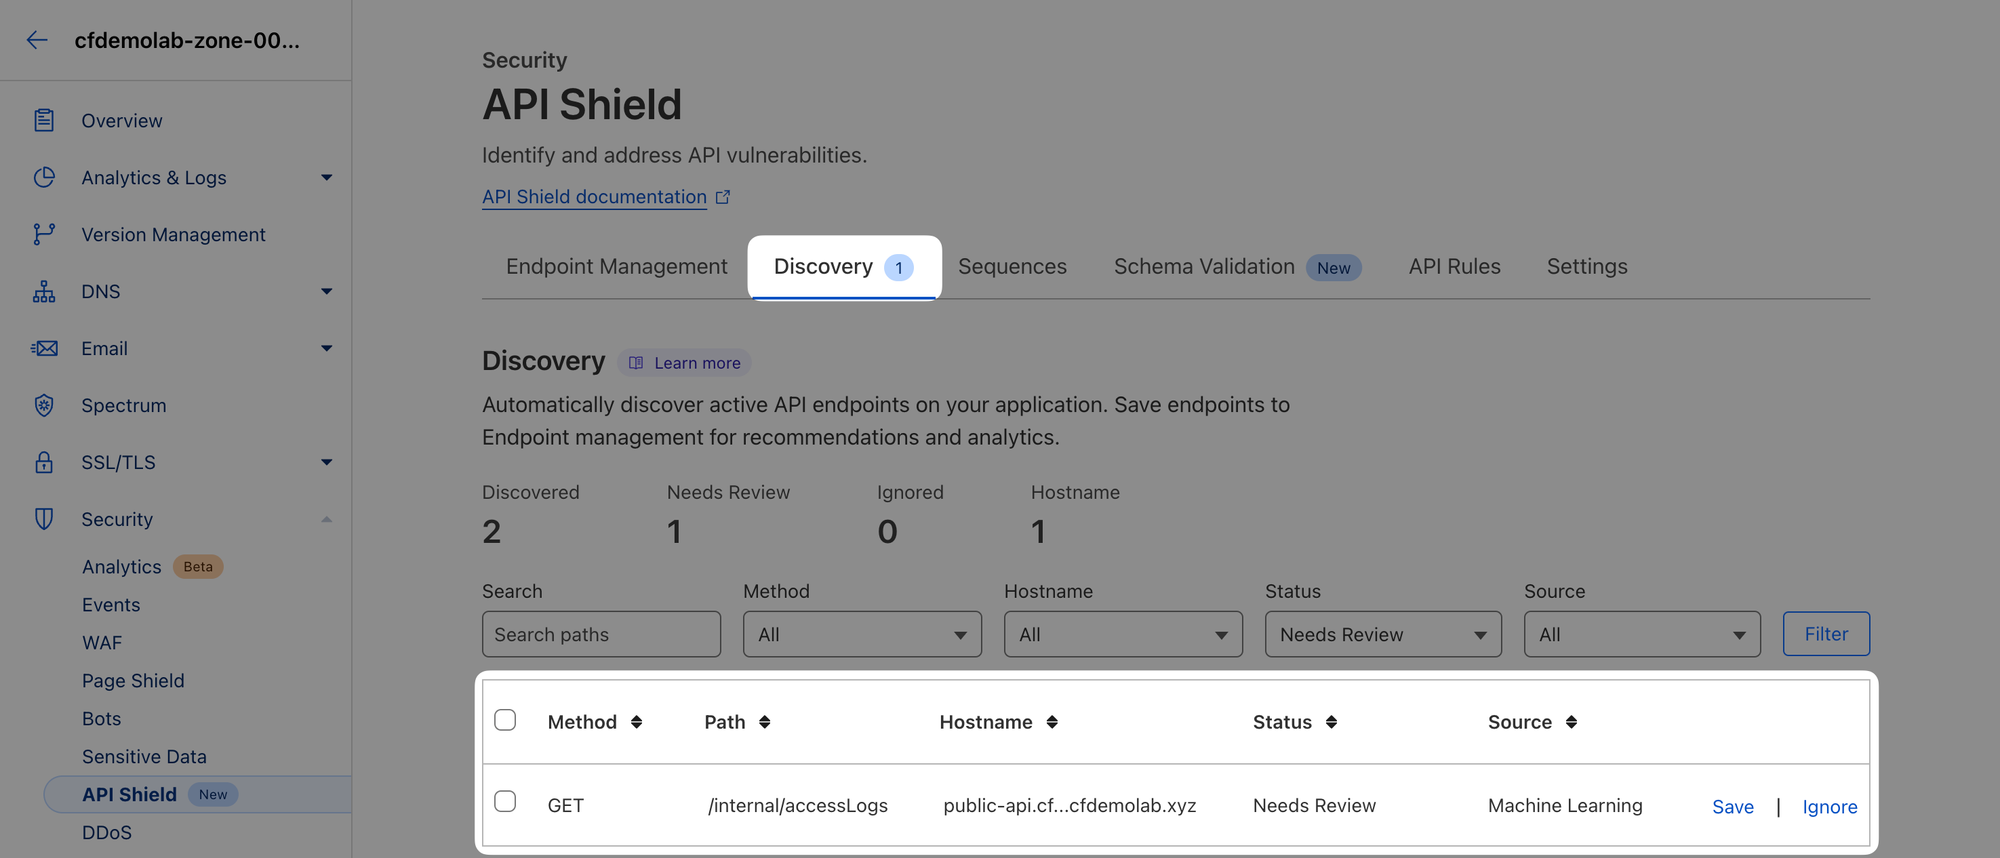
This is clearly a private API endpoint that should not be publicly accessible. It has been misconfigured and exposed unknowingly.
Verify this endpoint is really accessible:
$ curl -si https://public-api.cfdemolab-zone-xxx.cfdemolab.xyz/internal/accessLogs
HTTP/2 200
...
{
"logs": [
{
"timestamp": "Fri Feb 09 2024 05:36:23 GMT+0000 (Coordinated Universal Time)",
"user": "Roosevelt.King41",
"action": "Logged out",
"ipAddress": "34.132.152.39",
"status": "Success"
},
{
"timestamp": "Thu Feb 08 2024 11:07:35 GMT+0000 (Coordinated Universal Time)",
"user": "Demario.Bednar87",
"action": "Updated profile",
"ipAddress": "173.8.94.211",
"status": "Failure"
}
],
"success": true
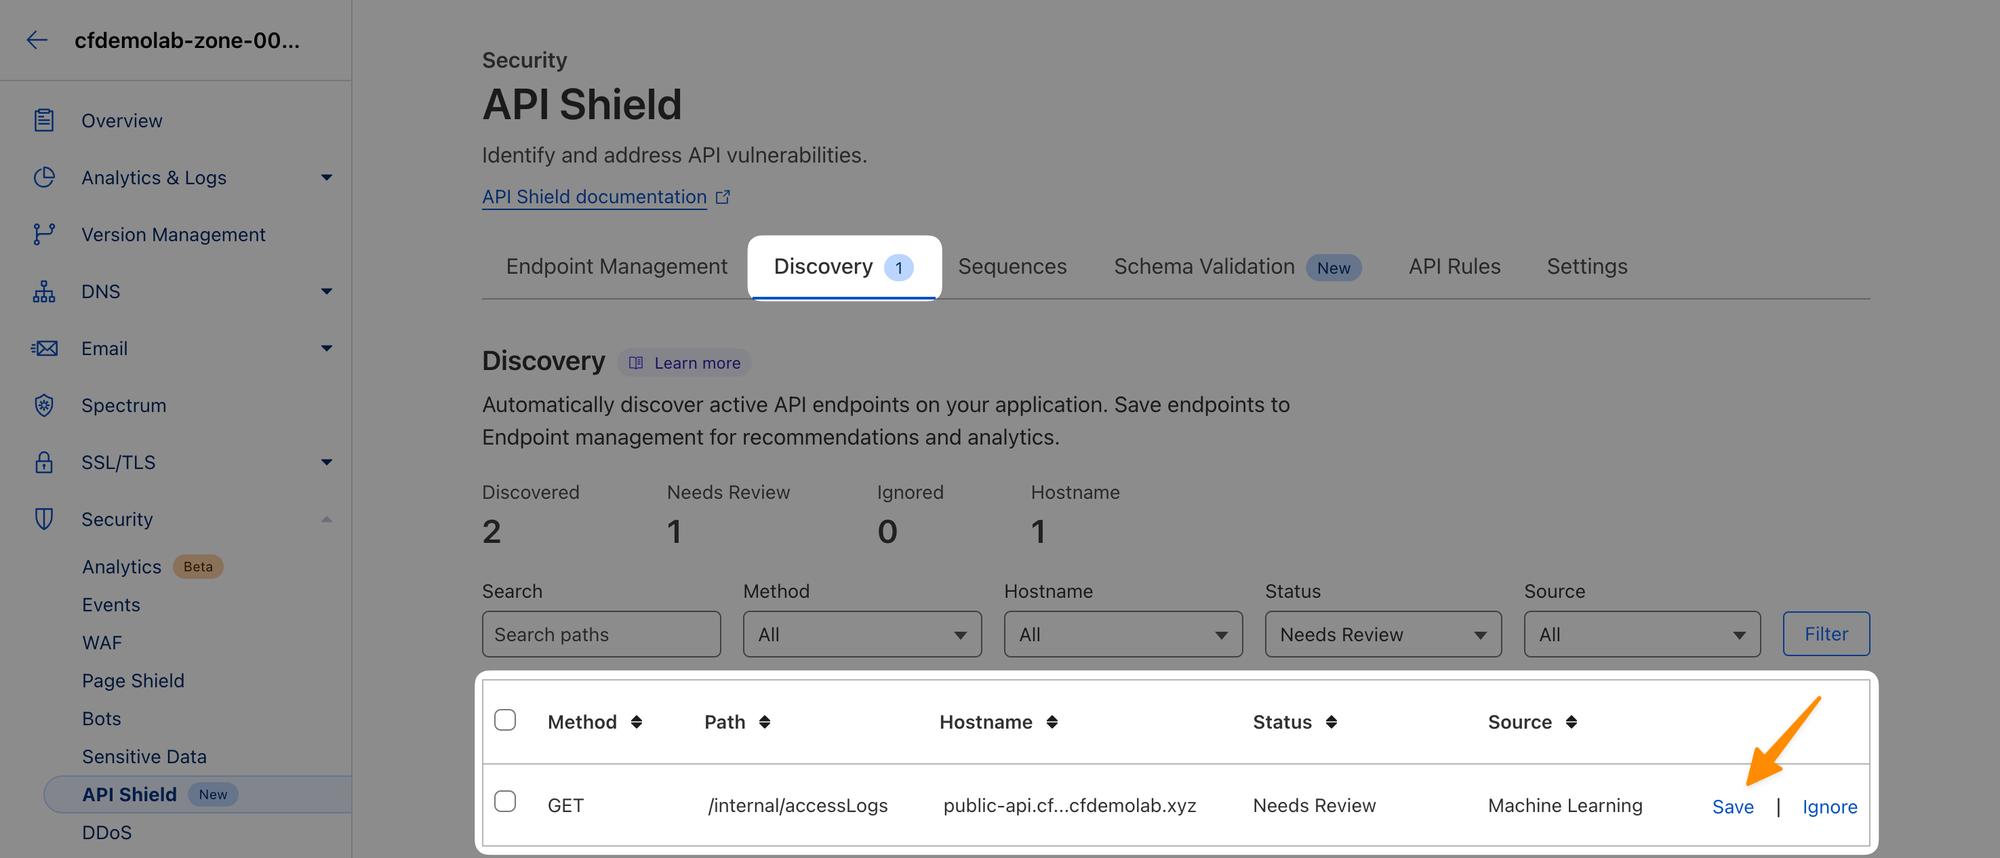
}Ok, this is not good. Let's add it to our managed endpoints so we can keep track on how much traffic it receives. In the Discovery tab click on Save next to this endpoint:
That should bring it here:
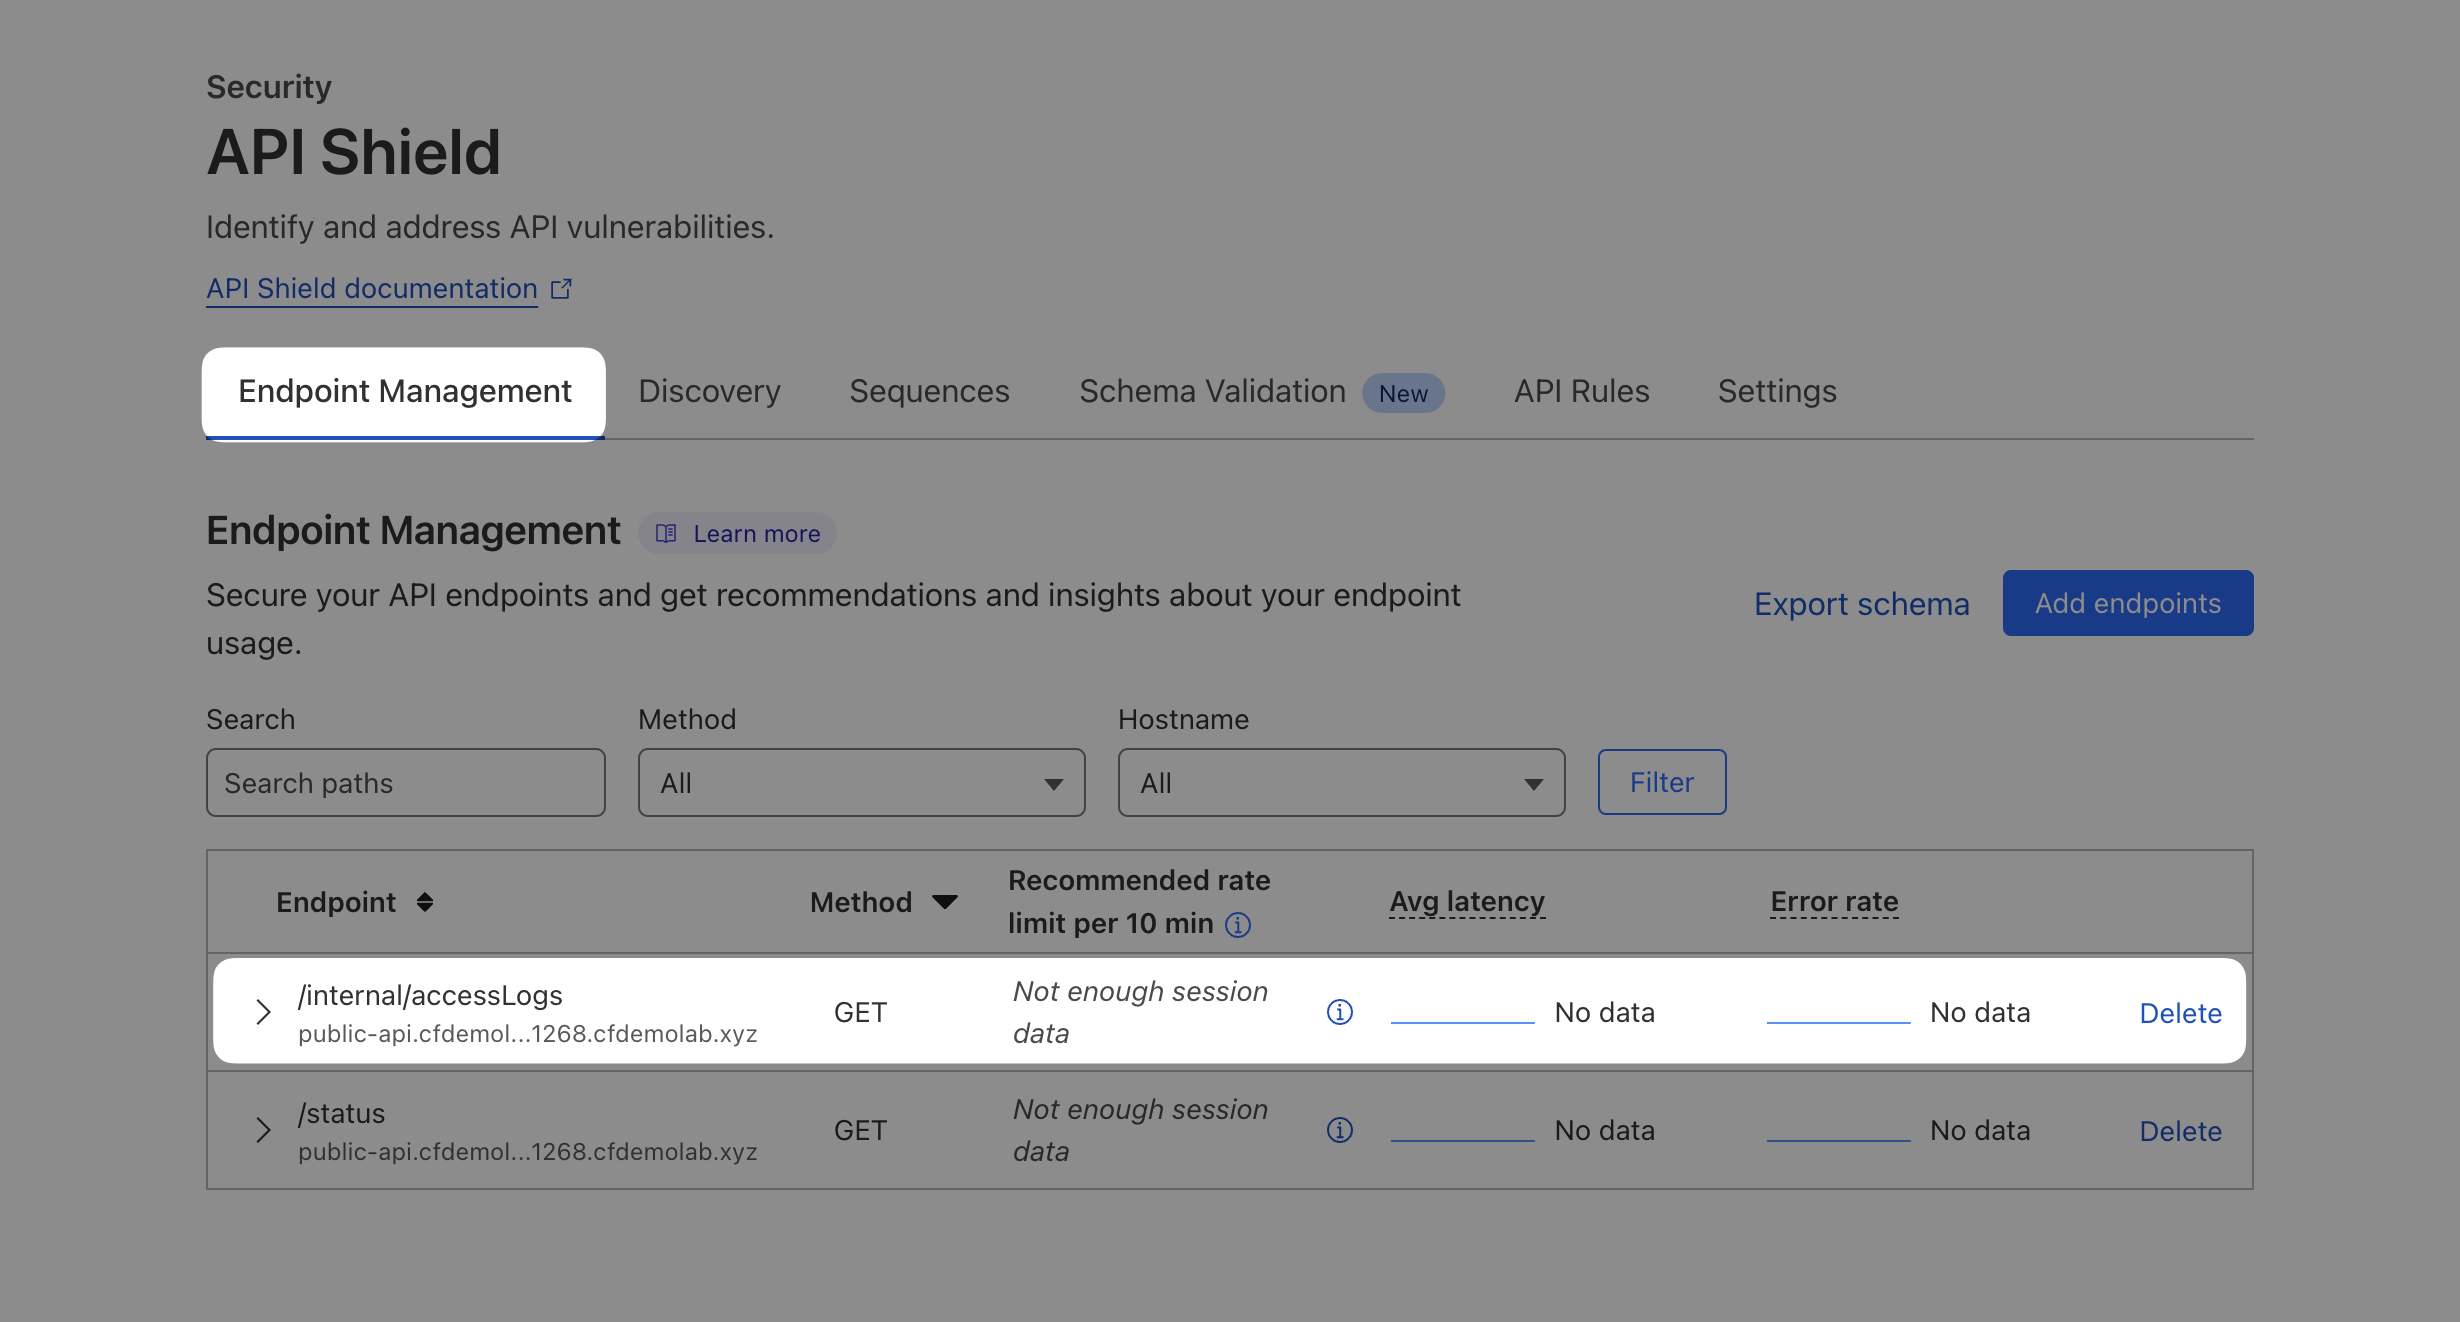
That will allow us to keep an eye on it in the long term.
As an independent exercise without further guidance from us, head over to Security ‣ WAF and create a rule that would block all traffic to this API endpoint with HTTP status 403 - Forbidden.
When you're done and your rule is deployed, retest your endpoint again and this time you should receive 403 - Forbidden:
$ curl -si 'https://public-api.cfdemolab-zone-xxx.cfdemolab.xyz/internal/accessLogs'
HTTP/2 403
...
That's it for the preconfigured API. Next, let's add a new API from scratch.
5. Set up DNS record for 2nd API
AcmeCorp enables order placement through their 2nd API, accessible at IP 4.157.169.241.
First, create a DNS record for this API under DNS ‣ Records:
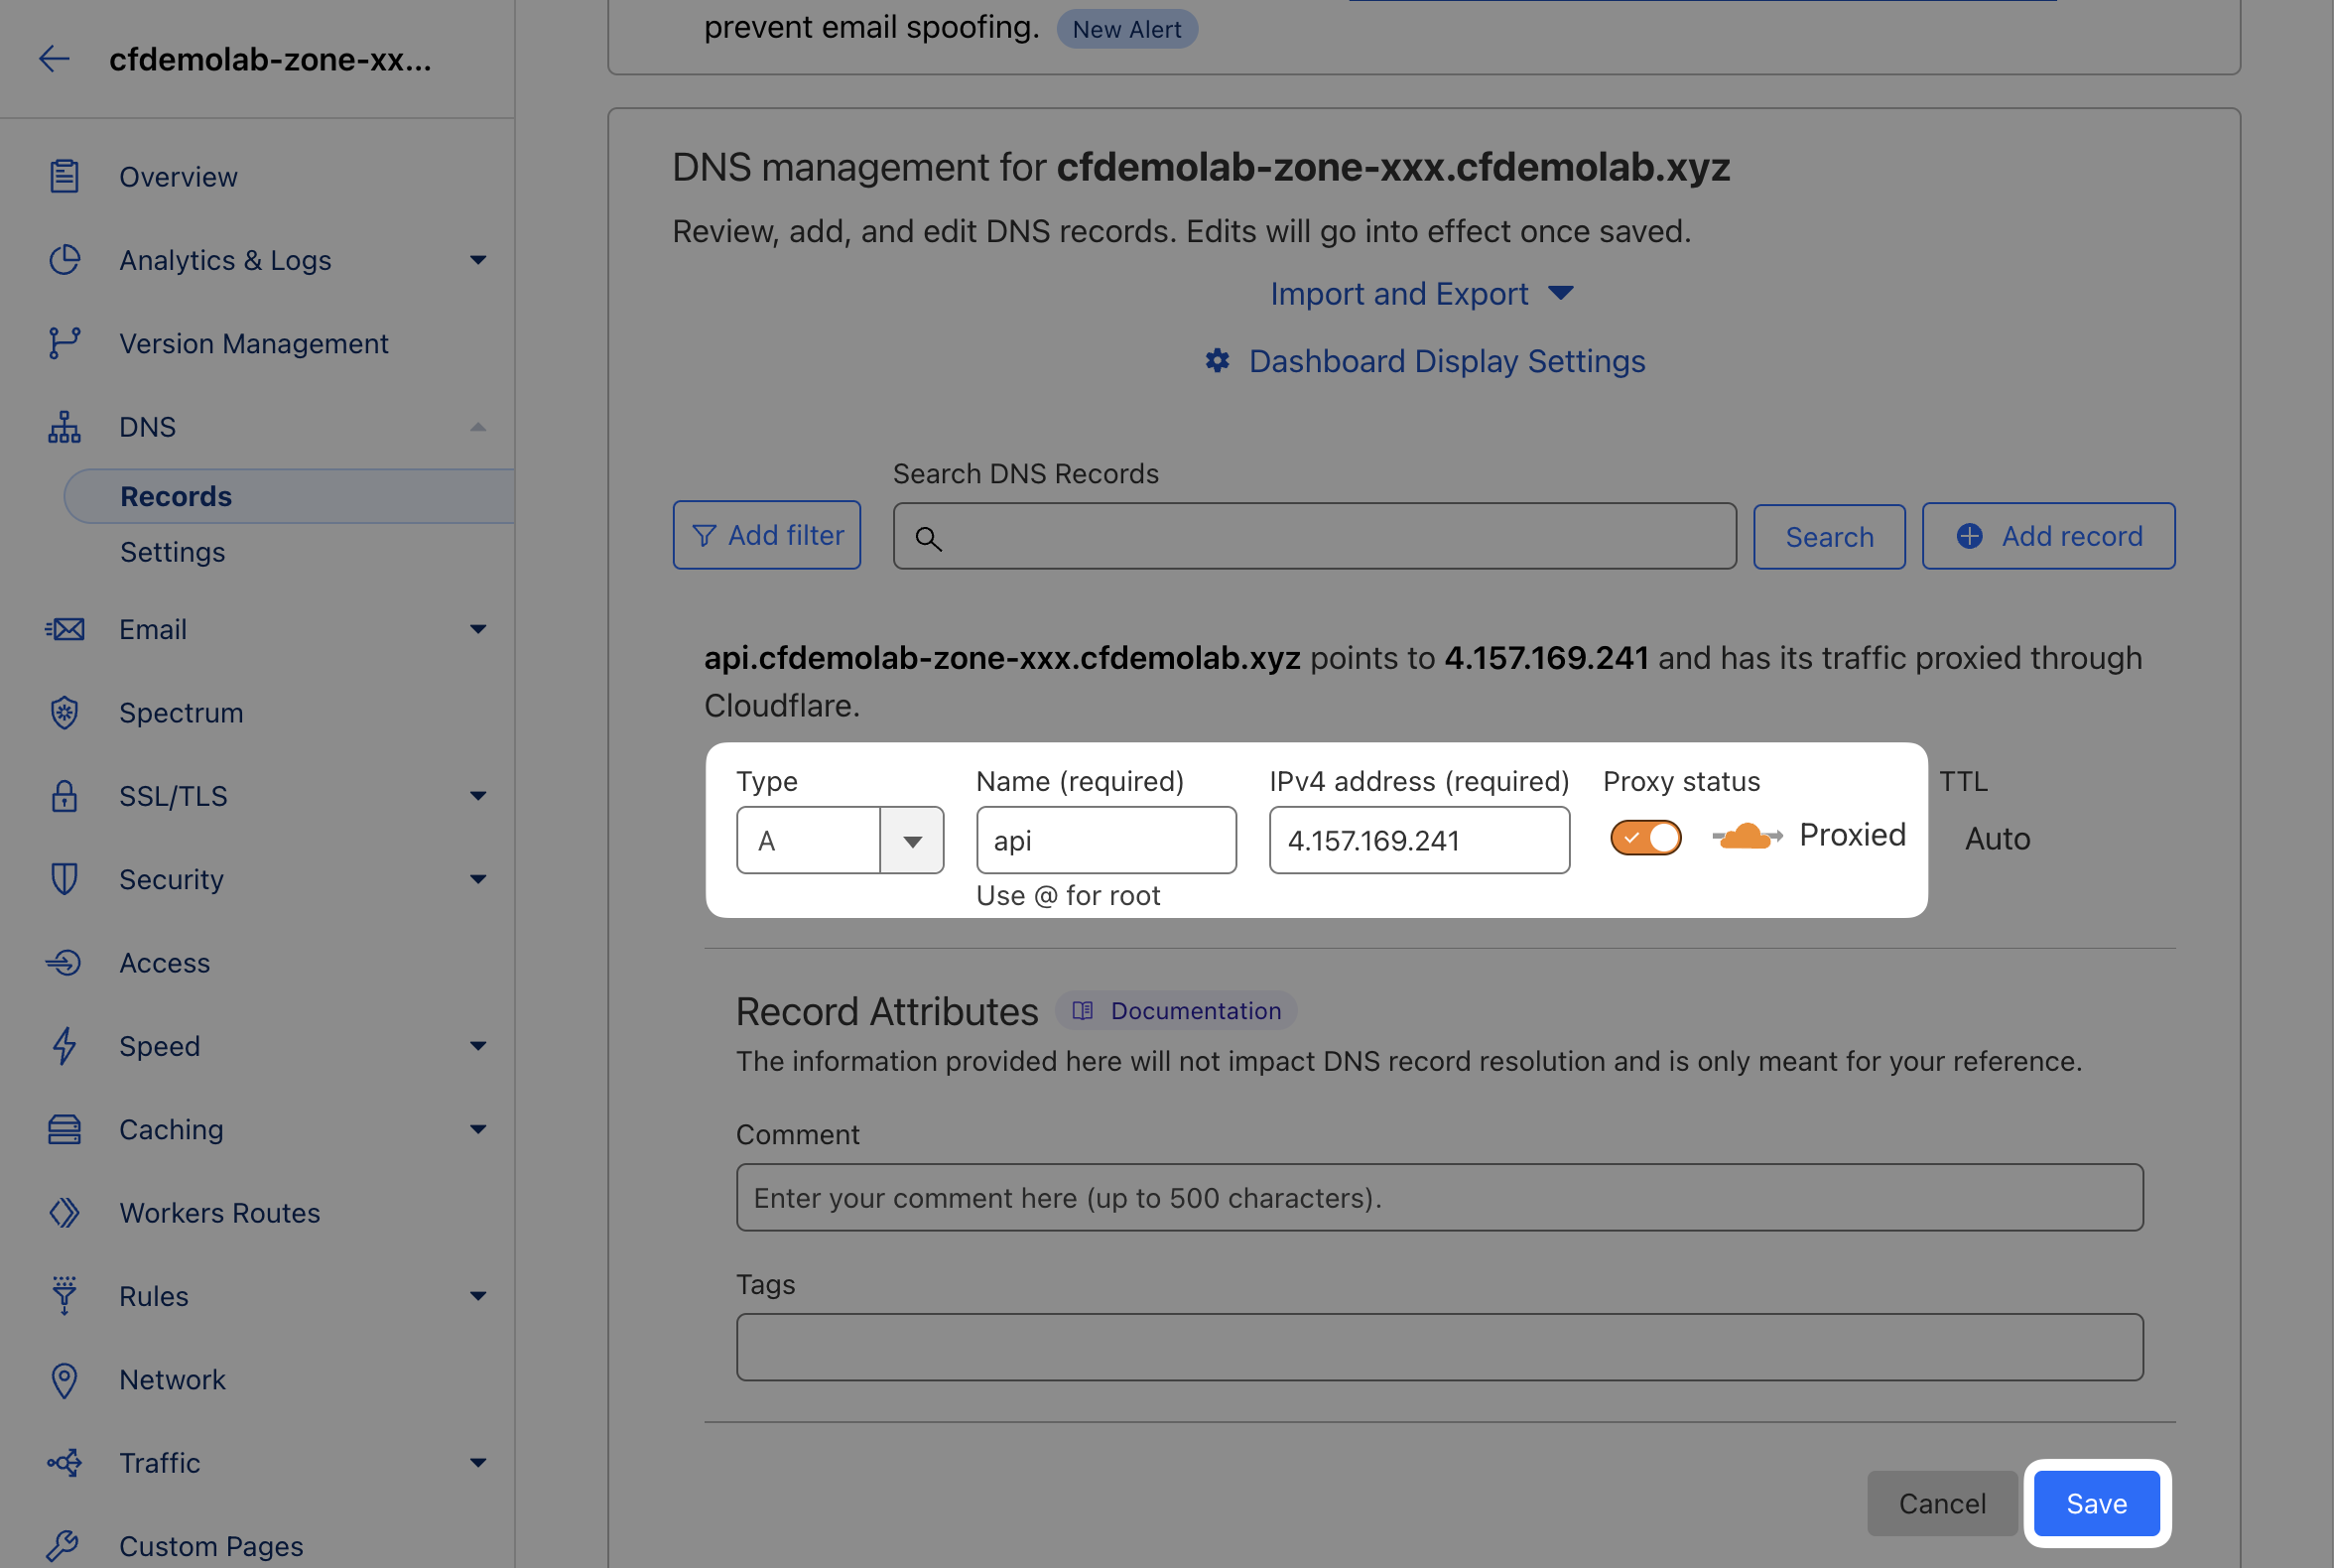
Type: A
Name: api
IPv4 address: 4.157.169.241
Proxy: yes6. Double-check Session Identifier is configured
In Security ‣ API Shield ‣ Settings, scroll down to Session identifiers section and double-check a session identifier looking for header "session-id" is configured. The purpose of this is to identify the individual user session, e.g. for rate limiting.
7. Enforce Schema Validation
Acme Corp developers have reviewed the schemas for this new API and have submitted their schemas to you in Open API 3.0 format. It's now time to get the schema and upload it to Cloudflare to enforce a positive security model.
First, head over to our API Schema Generator and plug in your zone:
https://schema-generator.labs.cfdata.org/

Save the downloaded schema and head over to Security ‣ API Shield and switch to the Settings tab. There, scroll down to Schema Validation settings:
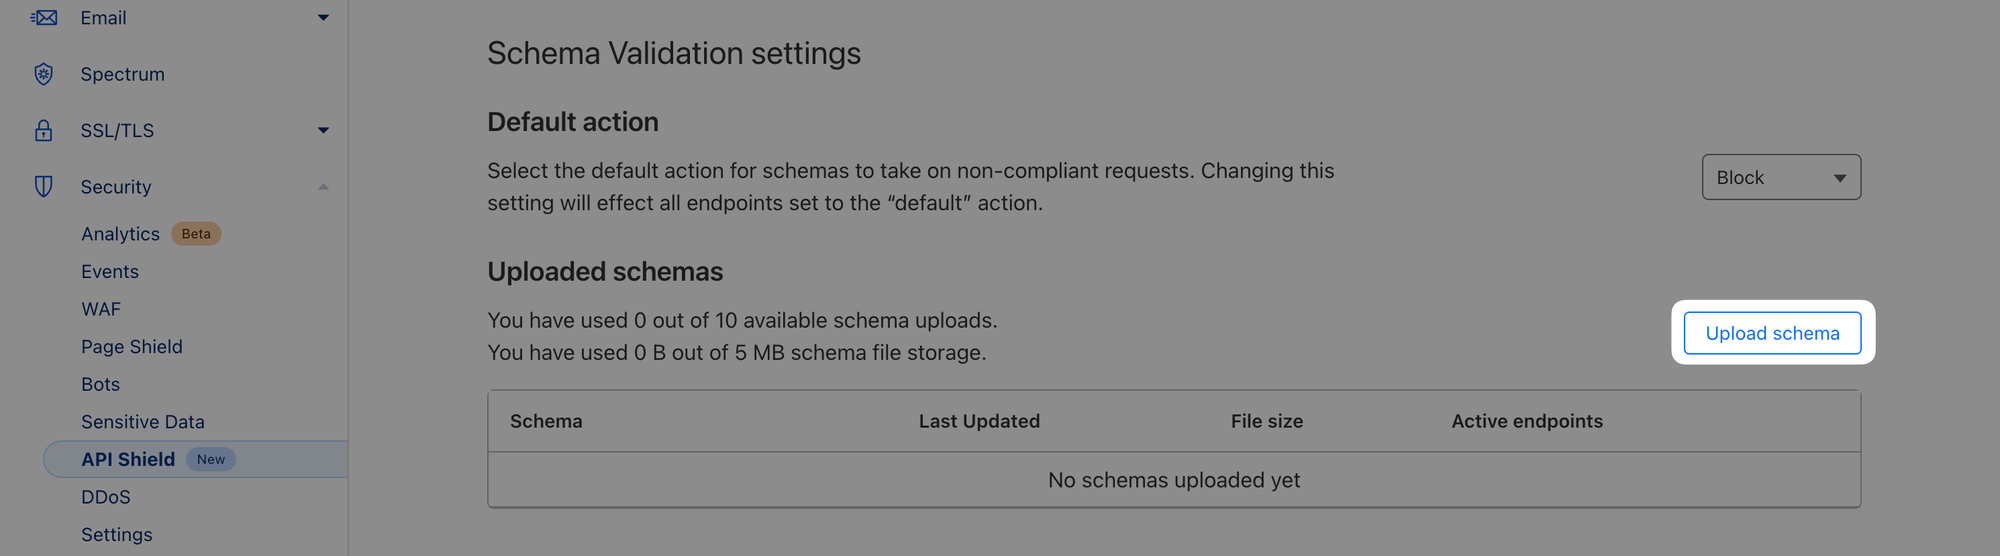
Upload the schema you downloaded from the generator and note the 4 endpoints that are being added. Before you add the schema, change the action to Block.
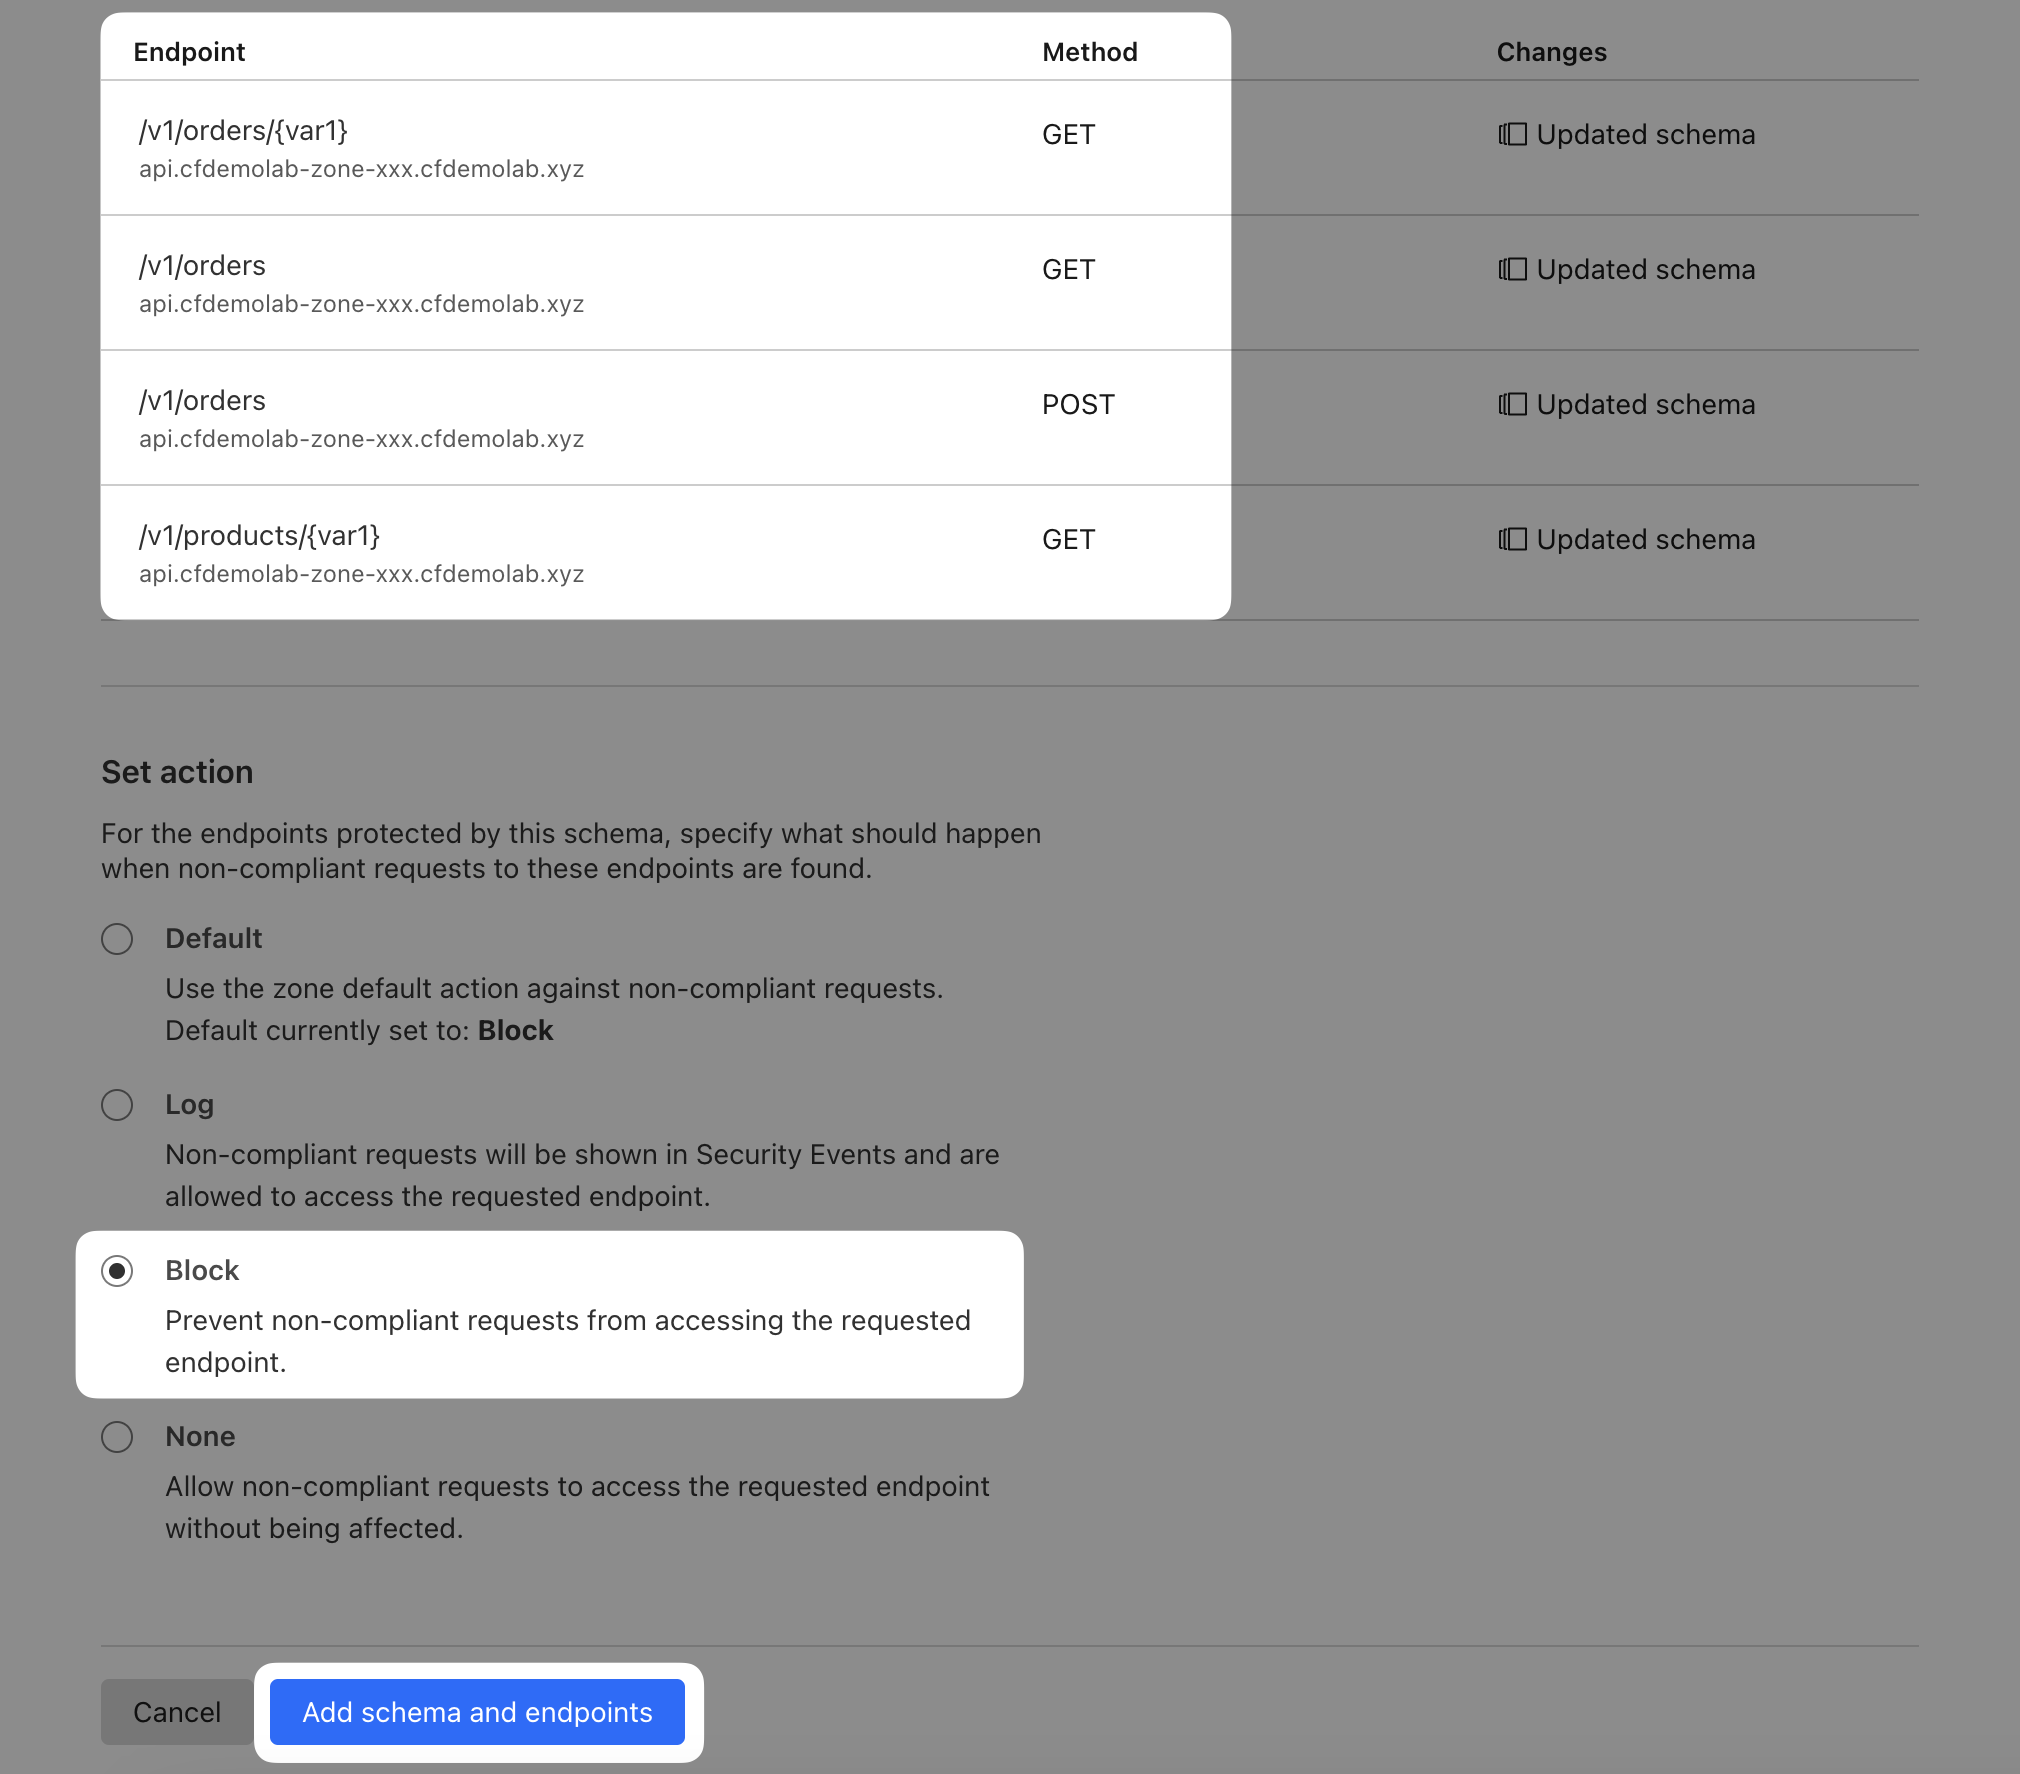
What this does is it enforces the schema on the endpoints that have been added and blocks any requests that do not conform. So for example, the POST /order endpoint requires JSON body with two keys: createdBy:string and items:array.
"requestBody": {
  "required": true,
  "content": {
    "application/json": {
      "schema": {
        "type": "object",
        "properties": {
          "items": {
            "type": "array",
            "example": [
              "5bd195af-f22a-4cf7-ae9b-116d47104fbc",
              "14454ece-bf61-4844-84a7-589fe9bf9a81"
            ]
          },
          "createdBy": { "type": "string", "example": "JohnDoe" }
        }
      }
    }
  }
},
Let's now test API Shield is enforcing that schema. If we conform with the schema, the request is allowed through and it reaches the API:
$ curl -iX POST 'https://api.cfdemolab-zone-xxx.cfdemolab.xyz/v1/orders' \
                 -d '{ "items": ["1", "2"], "createdBy": "Steve" }' \
                 -H 'Content-Type: application/json'
HTTP/2 200
...
{
  "id": 1905,
  "success": true
}
However, if we send a request that doesn't conform with the schema (because items needs to be an array and here it's a string), we get an error:
$ curl -iX POST 'https://api.cfdemolab-zone-xxx.cfdemolab.xyz/v1/orders' \
-d '{ "items": "1", "createdBy": "Steve" }' \
-H 'Content-Type: application/json'
HTTP/2 403
...
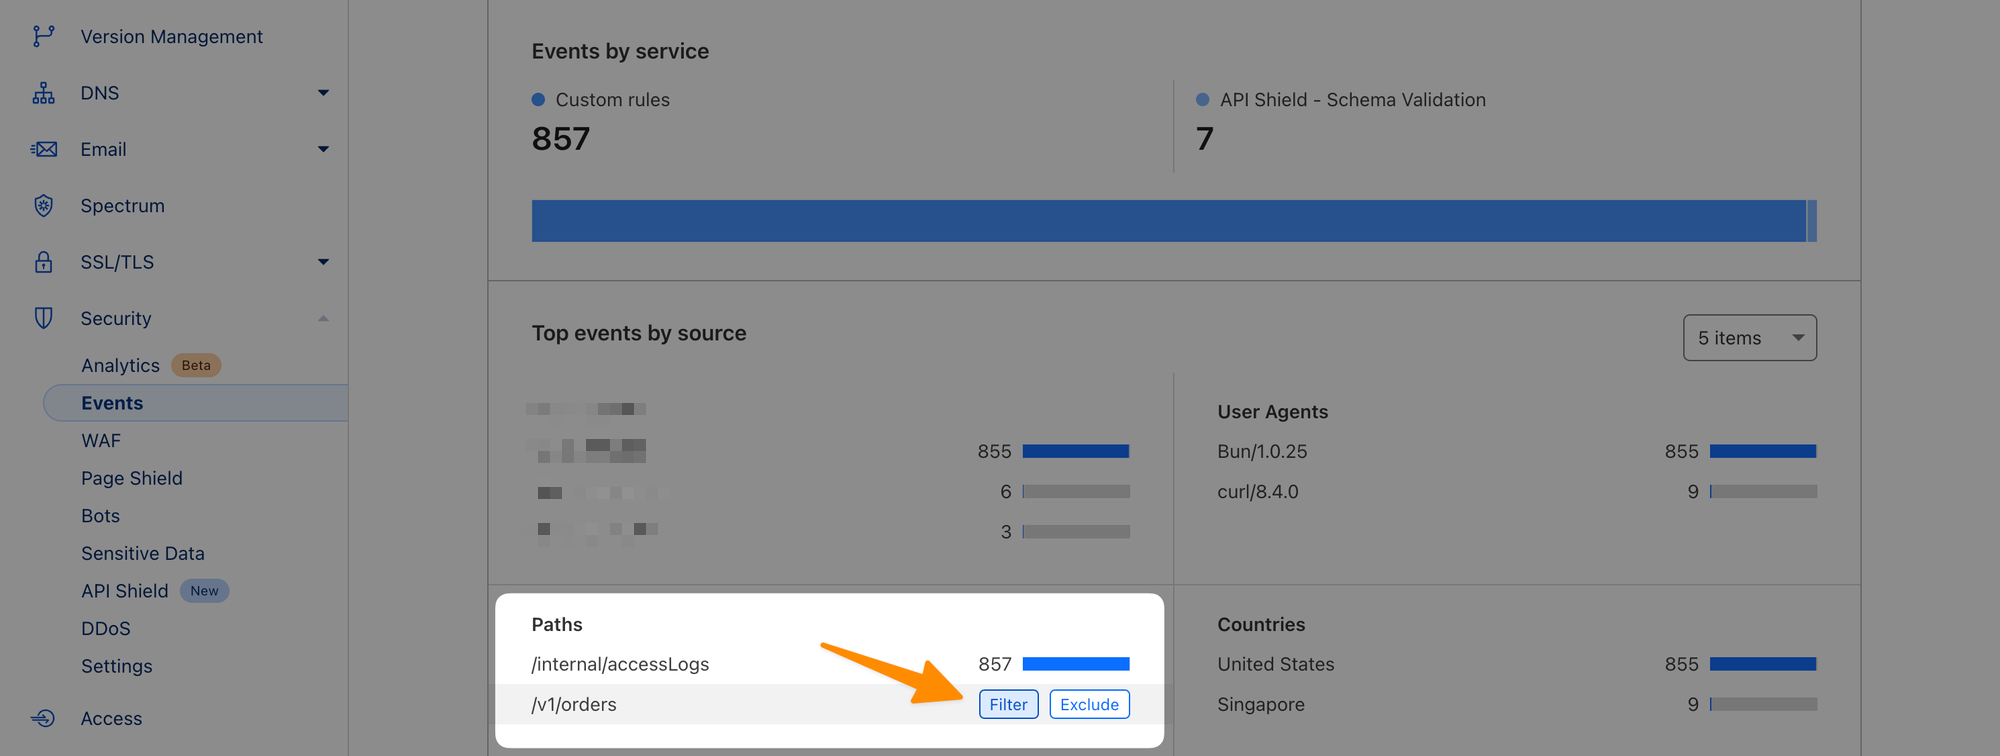
error code: 1020To double-check the cause of the error, navigate to Security ‣ Events, scroll down to Paths and Filter the /v1/orders path:
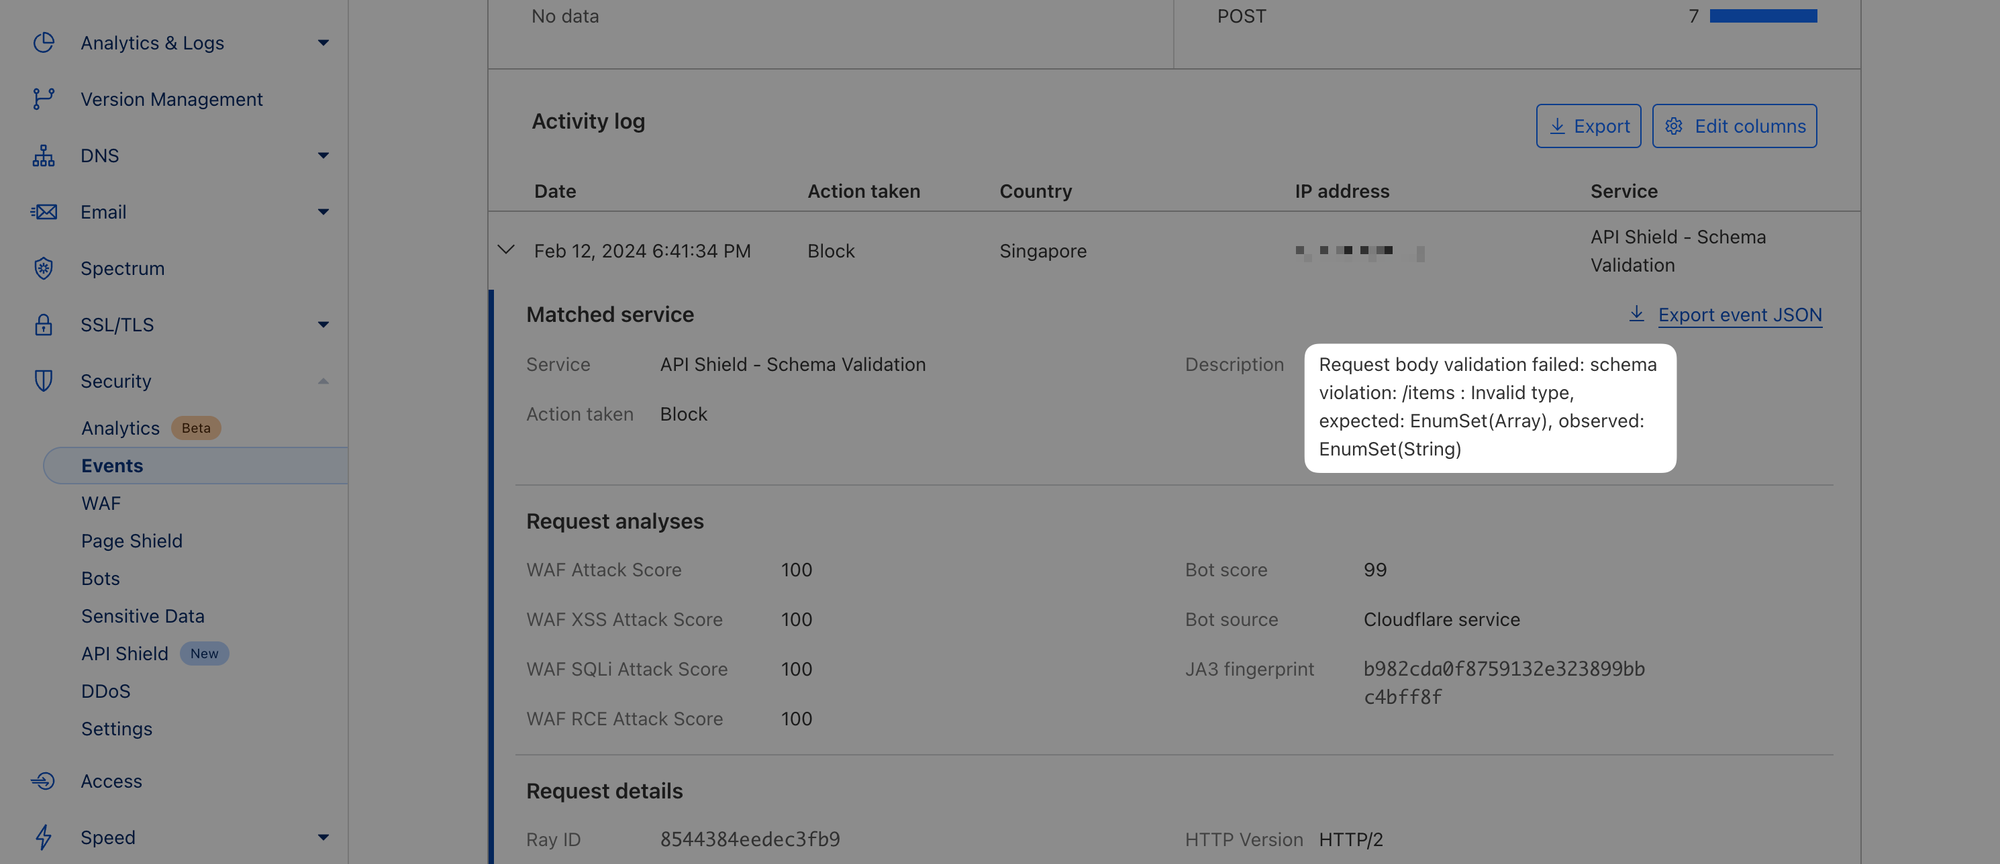
Expand the most recent event and you should see detailed reasoning:
8. Fallthrough
In Step 2, you were asked to build a WAF to block a specific API endpoint. But what if you wanted to block access to all endpoints and methods outside of your schema? We'll show you how to achieve this with a fallthrough WAF rule.
Head over to Security ‣ WAF again and create a new rule. Give your rule some name and then click "Edit expression" next to "Expression Preview". Paste in the following expression:
(http.host matches "^api\.|^public-api\." and cf.api_gateway.operation_id eq "")This will match requests to both of your APIs (all hostnames starting with api. and public-api.) that were not associated with any operation (requests that did not match any of your managed Endpoints).
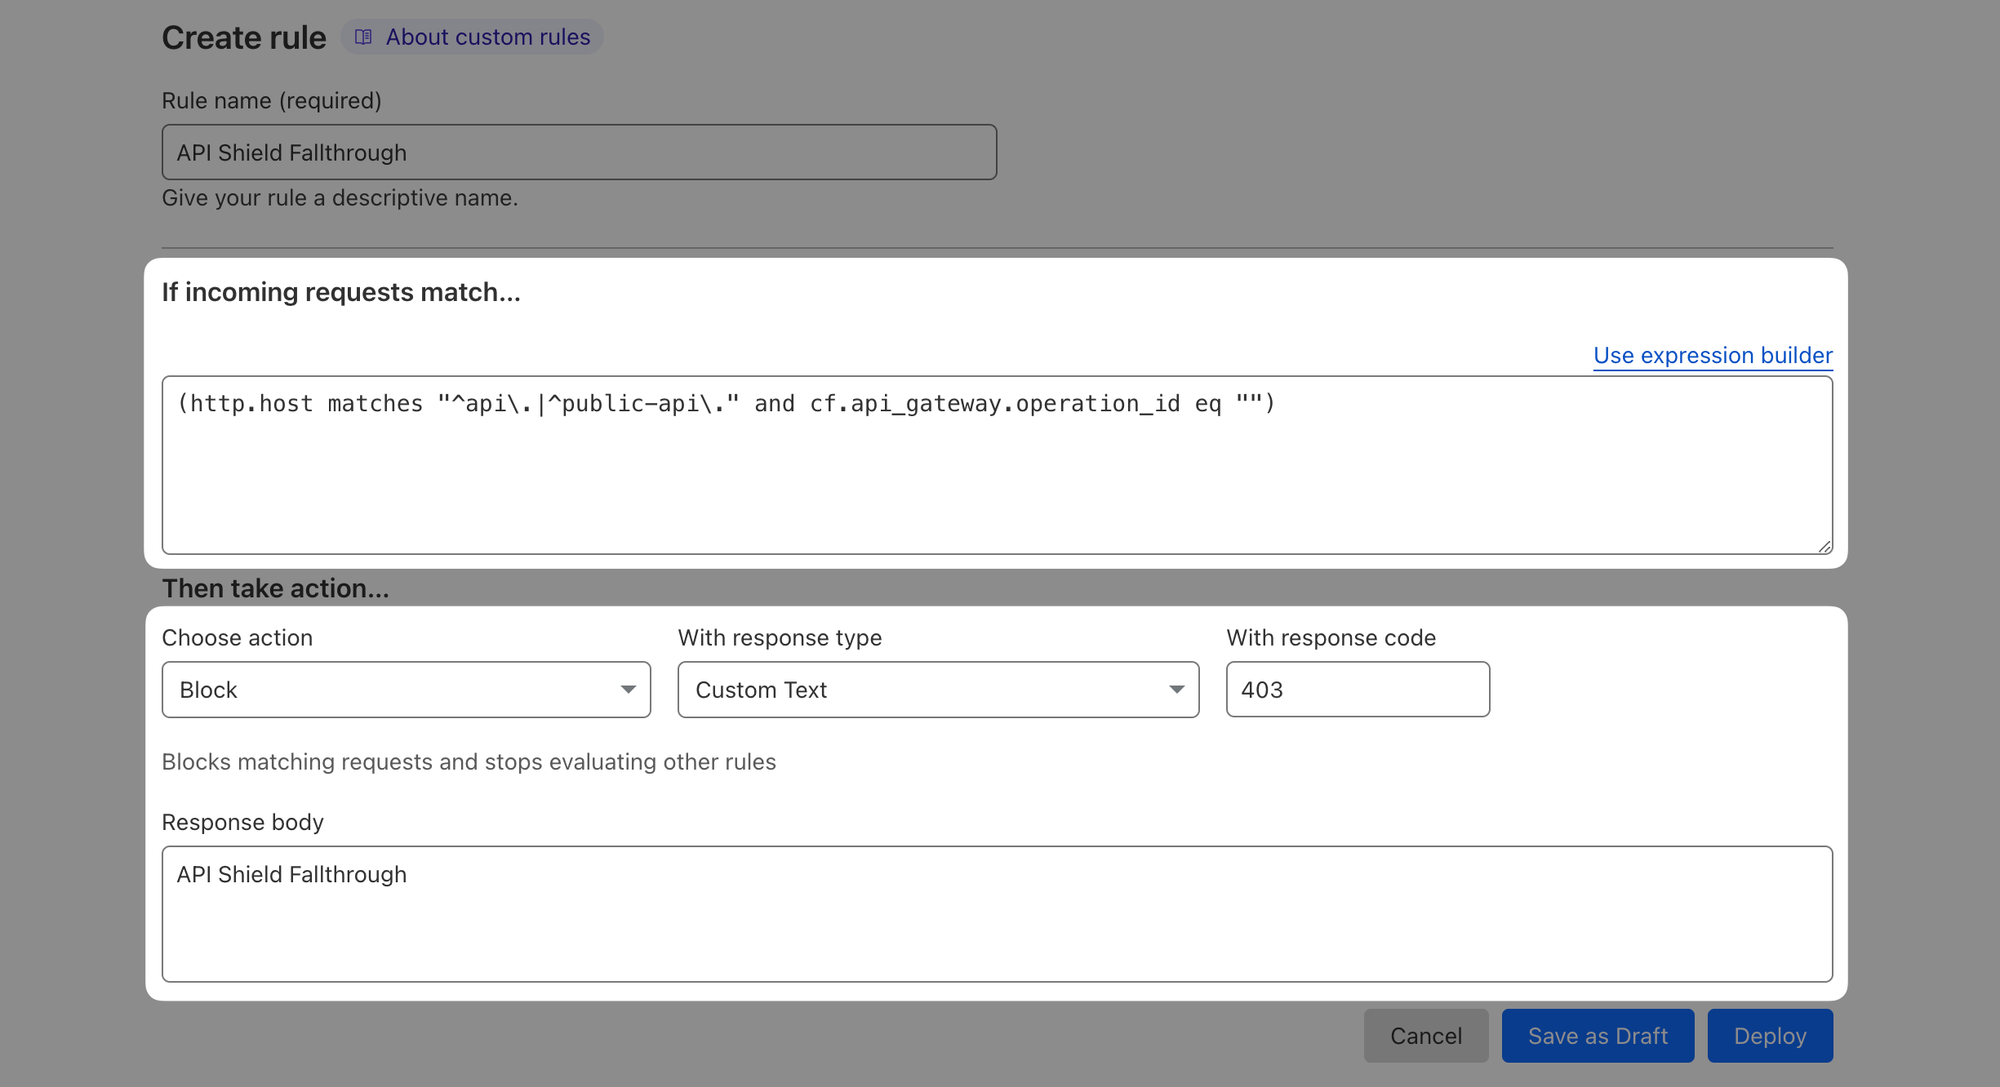
Block matching traffic with some response code and custom text and Deploy.
When you now try to access some endpoint or method that is not explicitly described by the schema, your request should be rejected:
# wrong endpoint
$ curl -iX GET 'https://api.cfdemolab-zone-xxx.cfdemolab.xyz/v1/trying/hidden/endpoint' \
-H 'Content-Type: application/json'
HTTP/2 403
...
API Shield Fallthrough
# good endpoint, but wrong method
$ curl -iX DELETE 'https://api.cfdemolab-zone-xxx.cfdemolab.xyz/v1/orders' \
-H 'Content-Type: application/json'
HTTP/2 403
...
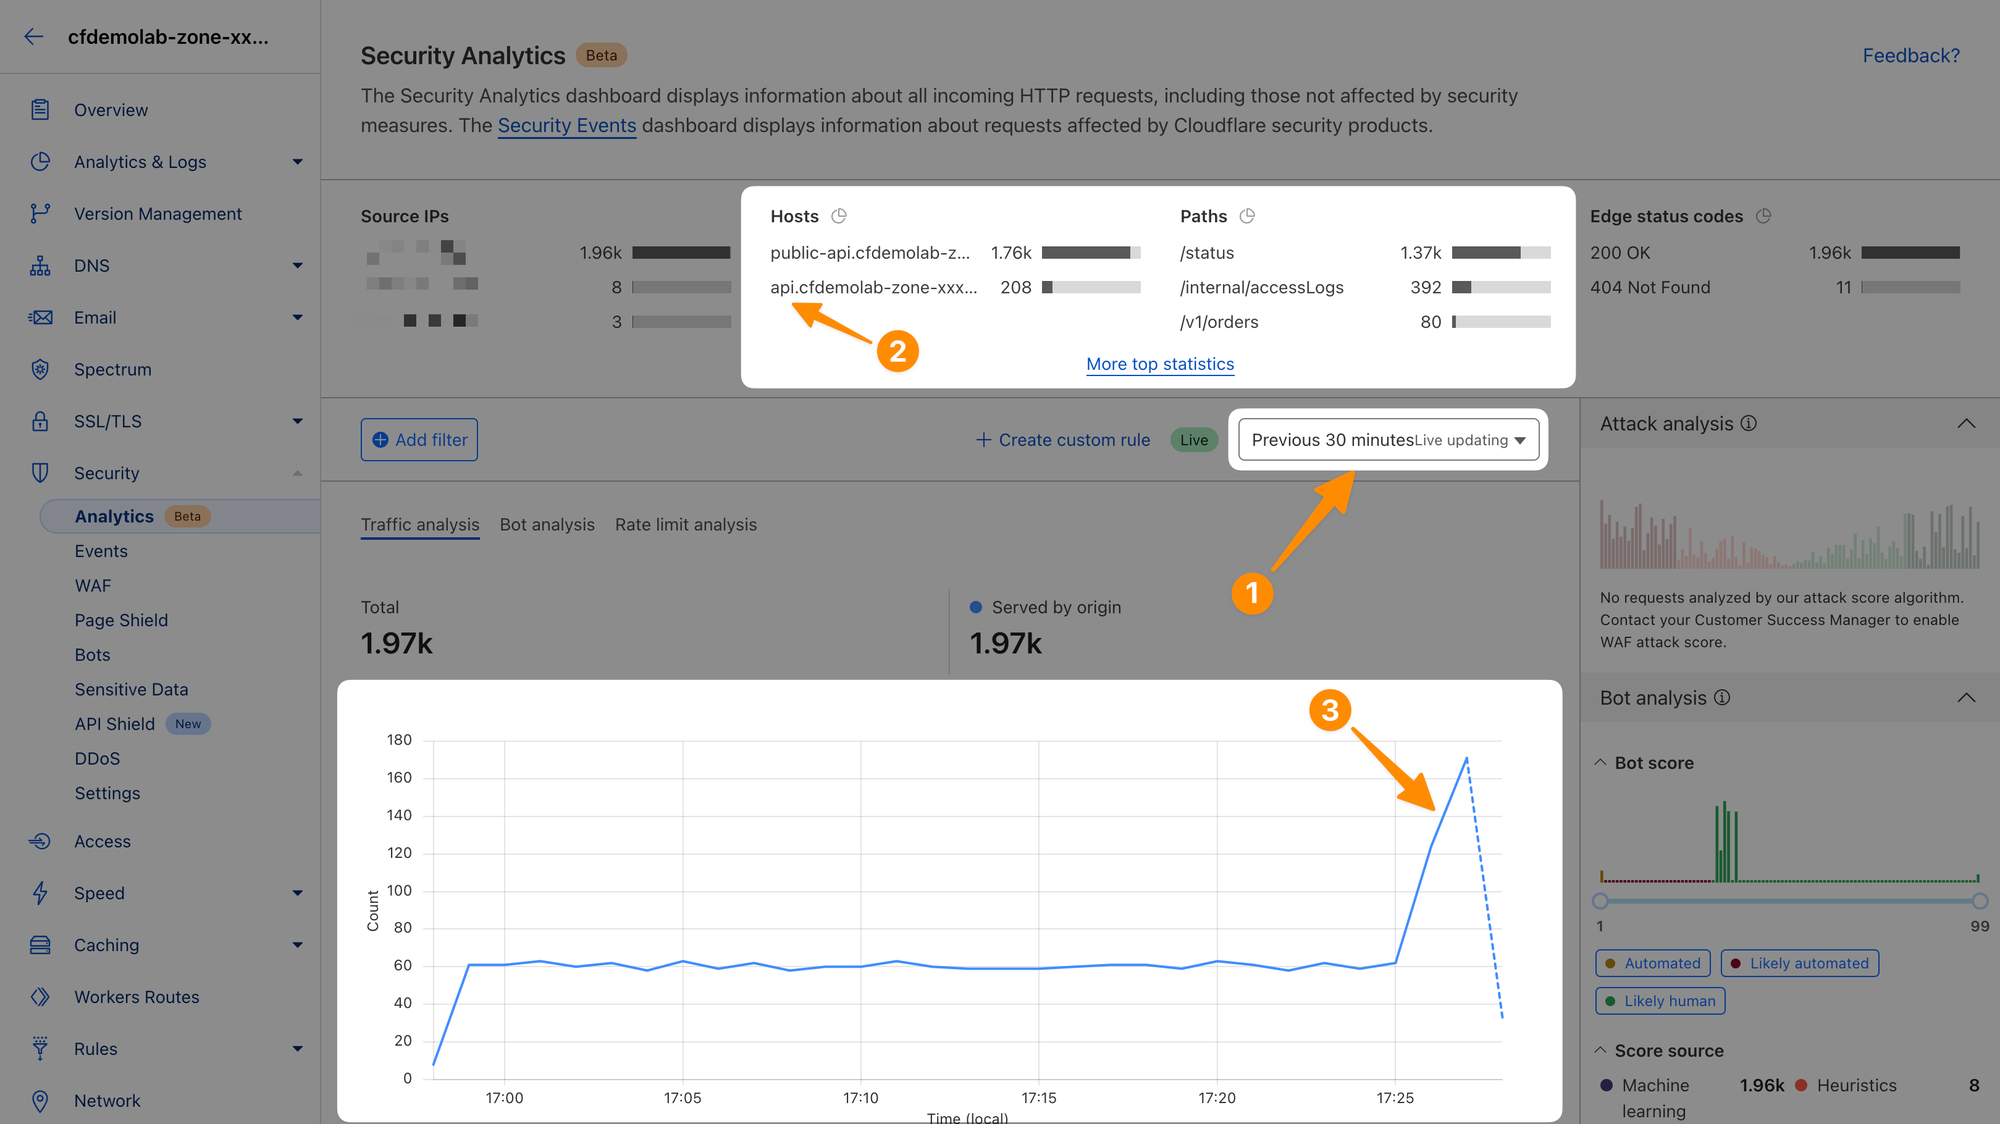
API Shield Fallthrough9. Monitor Traffic Statistics
Before we wrap up, while we are on the topic of logs and analytics, head over to Security ‣ Analytics and switch the logging window to Previous 30 minutes (1). The new API you defined earlier was receiving traffic for a few minutes now. You should see the newly added API subdomain in Hosts (2) and overall traffic to your account should pick up significantly (3).
Done!
We have explored a pre-configured API and configured a new one from scratch.